Have you ever struggled with dull knives in your kitchen? As a professional chef for 15 years, I’ve learned that knowing how to sharpen knives properly is absolutely essential for safe and enjoyable cooking. Nothing beats the satisfying feel of a razor-sharp blade gliding effortlessly through vegetables or meat. Whether you’re a home cook or aspiring chef, mastering the art of knife sharpening will transform your cooking experience.
In this comprehensive guide, I’ll share my tried-and-true techniques to achieve that perfect edge every time. From choosing the right sharpening tools to mastering the correct angle, you’ll discover everything you need to keep your knives performing at their best. Let’s dive into the world of knife maintenance and unlock the secrets to professional-grade sharpening!
Why Knife Sharpening Matters for Your Kitchen ?
Understanding Blade Degradation Over Time
Have you noticed your kitchen knives becoming less effective lately? The science behind blade dulling reveals why regular knife sharpening is crucial. Every time your blade meets a cutting board, microscopic metal particles bend and wear away. Think of it like tiny soldiers falling in battle – each cut takes its toll. Even premium steel knives naturally lose their edge through daily use.
I’ve seen countless home cooks struggle with dull blades, not realizing how this affects their food prep safety. When you need more force to cut, you risk the blade slipping. Plus, dull knives actually damage your ingredients, crushing cell walls instead of cleanly slicing through. Just last week, a student in my cooking class was amazed at how her bruised tomato slices transformed into perfect cuts after learning proper knife maintenance. The good news? Understanding this natural wear process helps you stay ahead of blade deterioration.
Impact on Food Preparation Quality
Properly sharpened knives transform your everyday cooking experience in ways you might not expect. When I tested identical vegetables with sharp versus dull blades, the differences were striking. Sharp knives preserve more nutrients by cleanly separating cell structures instead of crushing them. You’ll notice this especially with herbs – a razor-sharp blade keeps basil bright green, while dull knives turn it black and mushy.
In my kitchen, I’ve found that precise cuts also affect cooking times dramatically. Uniformly sliced potatoes roast evenly, while irregular chunks leave you with a mix of undercooked and burnt pieces. The texture of your dishes improves too. Just yesterday, I was slicing sashimi-grade tuna, and the clean cuts resulted in that signature silky mouthfeel you get at high-end restaurants. Plus, those picture-perfect cuts make your home-cooked meals look professionally plated.
Safety Benefits of Well-Maintained Knives
When you sharpen knives regularly, you significantly reduce the risk of kitchen accidents. I learned this the hard way last summer when my dull chef’s knife slipped off a tomato and nearly caught my finger. A sharp blade requires less force to cut, giving you better control and preventing dangerous slips. You’ll notice the difference immediately – instead of struggling and pushing down hard, the knife glides smoothly through ingredients.
I’ve started teaching my teenage kids about knife safety, and the first rule is always keeping blades sharp. Interestingly, most kitchen injuries happen with dull knives because people compensate by using more pressure. In my cooking classes, students often grip dull knives too tightly, causing hand fatigue and reduced precision. Remember, a properly sharpened knife should do the work for you, not your muscles.
Step-by-Step Knife Sharpening Method
Selecting the Right Sharpening Tools
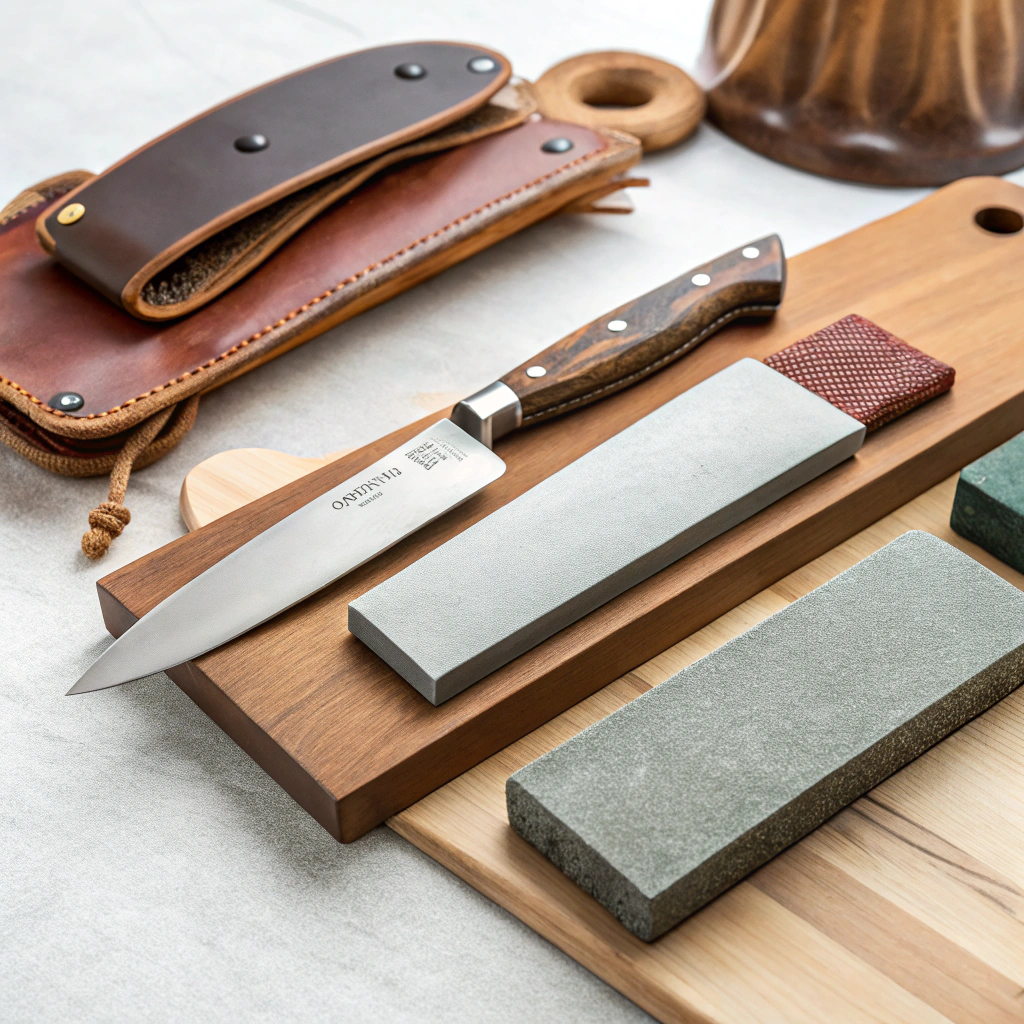
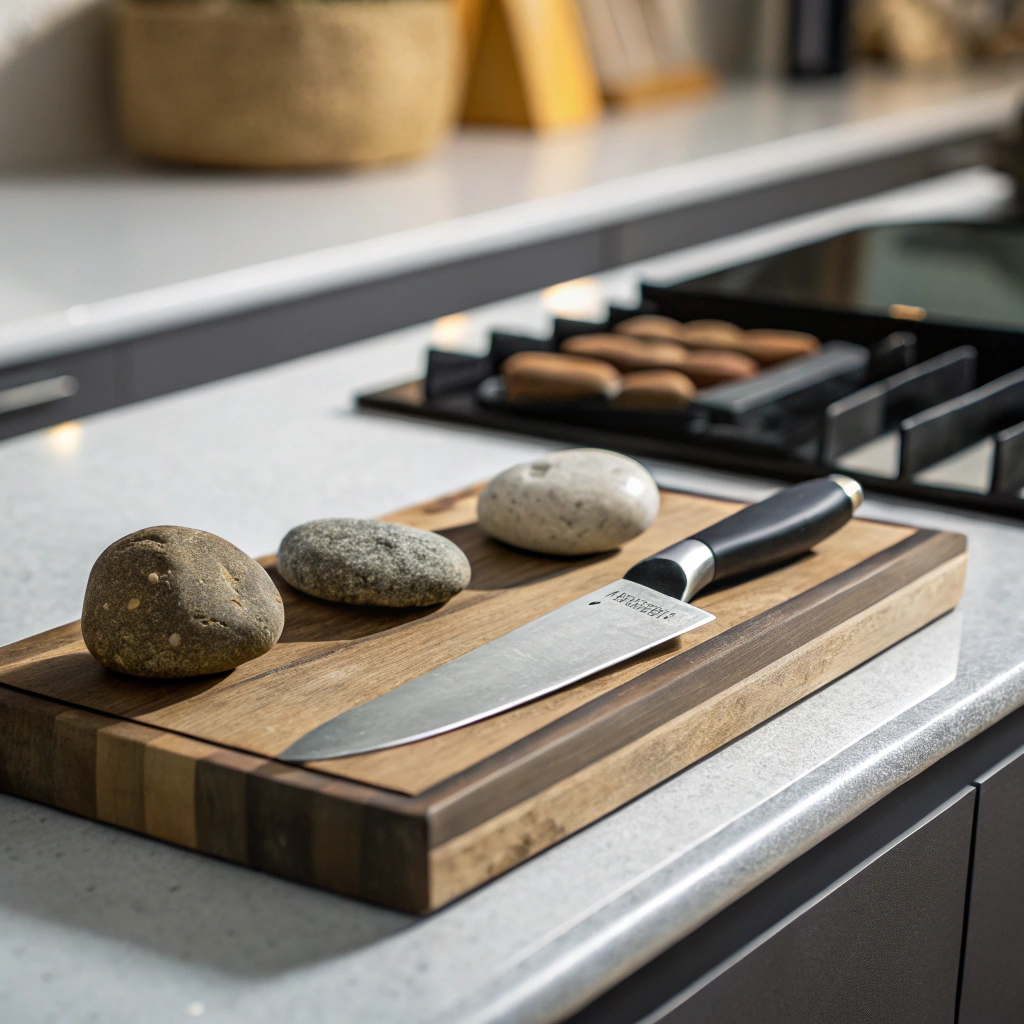
Every chef knows that successful knife sharpening starts with choosing the right tools. I keep three essential items in my kitchen: a quality whetstone (1000/6000 grit), a honing steel, and a leather strop. The whetstone does the heavy lifting for dull blades, while the honing steel maintains the edge between sharpenings. I learned through trial and error that using the wrong tools can actually damage your knives. A ceramic whetstone is perfect for beginners since it’s more forgiving than diamond stones.
When picking your first whetstone, look for one that’s at least 2 inches wide and 8 inches long – this gives you enough surface area to work with larger knives. Remember to soak your stone in water for 10-15 minutes before use. The sound of blade meeting stone should be smooth and consistent, like a gentle whisper across the surface.
Maintaining Your Knife's Edge
Proper maintenance between sharpenings is crucial for keeping knives razor-sharp. I’ve found that using a honing steel after every few uses helps realign the microscopic teeth along the blade’s edge. Hold your knife at a 20-degree angle against the steel, then draw it down and across in one smooth motion. Listen for that satisfying ‘shing’ sound – it tells you you’re doing it right! For Japanese knives, I prefer using a leather strop instead, as their harder steel responds better to stropping than steeling.
Make this a habit before each cooking session. You’ll notice your knives stay sharper longer, and you won’t need to break out the whetstone as often. Remember to wipe your blade clean after honing – those tiny metal particles can affect your next cut. This simple routine has kept my knives performing like new for years.
Professional Sharpening Methods
When it’s time for a full sharpening, you’ll need the right tools and technique. Start with a quality whetstone – I prefer a combo stone with 1000/6000 grit sides. Soak it for 15 minutes until no more bubbles rise. Position your knife at that crucial 20-degree angle against the stone. Using steady pressure, draw the blade across in a smooth arc, like you’re trying to slice a thin layer off the top. The sound should be a consistent ‘shhhhh’ – that’s your blade making perfect contact. Work from heel to tip, counting your strokes to keep them even on both sides.
Start with the coarse side for reshaping, then switch to fine grit for polishing. You’ll know you’re done when the edge can slice through paper without catching. Remember to clean your stone afterward and let it dry completely. This method takes practice, but the results are worth it.
Professional Knife Sharpening Secrets
Pressure Control Mastery
Getting the right pressure when sharpening knives is crucial for achieving that razor-sharp edge. Start light – use just enough force to maintain steady contact with your stone. Think of it like writing with a pencil – you want firm control without pressing so hard you break the lead. As you draw the blade across, maintain even pressure from heel to tip. Listen for that consistent ‘whisper’ sound that tells you you’re hitting the sweet spot.
Too much pressure will create an uneven edge or even damage your knife. Too little won’t remove enough metal to form a proper edge. Practice on an old knife first, paying attention to how the blade feels against the stone. You’ll develop muscle memory for that perfect pressure that professional chefs use. Remember – you can always make another pass, but you can’t undo excessive grinding.
Testing Your Sharpened Edge
Knowing when your knife is properly sharpened saves time and prevents over-grinding. The paper test is your best friend here – hold a sheet of printer paper vertically and try slicing downward. A truly sharp blade will cut cleanly without catching or tearing. Another reliable check is the tomato test. A sharp knife should effortlessly slice through tomato skin without squishing the fruit.
If you need to saw or apply pressure, keep sharpening. Watch for that telltale gleam along the edge – a properly sharpened blade has a consistent shine from heel to tip. Run your thumb gently parallel to (never across!) the edge. You should feel a subtle, uniform grab along the entire length.
For the ultimate test, try precision cuts on herbs. A sharp knife should create clean slices without bruising or crushing the delicate leaves.
Professional Knife Sharpening Tools
Every chef knows that sharpening knives requires the right tools for professional results. A quality whetstone is your foundation – look for a combination stone with both coarse (1000 grit) and fine (6000 grit) surfaces. Diamond plates offer excellent precision for serious home cooks, while ceramic honing rods help maintain that perfect edge between major sharpenings.
Leather strops, often overlooked, are essential for that final polish that makes your blade sing. For beginners, guided systems with preset angles take the guesswork out of achieving that perfect edge. Remember to keep your stones clean and flat – a flattening stone is worth the investment.
While electric sharpeners are convenient, they can be harsh on your blades. Invest in quality manual tools instead – they’ll serve you well for years and help develop crucial knife maintenance skills.
Common Knife Sharpening Mistakes to Avoid
Incorrect Angle Problems
Getting the right angle is crucial when sharpening knives, yet it’s where many home cooks stumble. The most common mistake is inconsistent angle holding, which creates an uneven edge that tears rather than slices. Most Western-style knives require a 20-degree angle on each side, while Japanese blades often need 15 degrees. Watch for telltale signs of wrong angles – if you hear a scratching sound or feel the stone catching, you’re likely too steep.
Another critical error is rushing the process and applying too much pressure. Let the stone do the work with gentle, steady strokes. Remember to maintain the same angle throughout the entire length of the blade, from heel to tip. Using a marker to color the edge can help you visualize where you’re removing metal and maintain consistency.
Essential Sharpening Tools and Equipment
Every knife sharpening journey starts with the right tools. A quality whetstone is your foundation – look for a combination stone with both coarse (1000 grit) and fine (6000 grit) surfaces. Traditional Japanese waterstones deliver exceptional results but require soaking before use. For beginners, diamond stones offer more stability and don’t need pre-soaking. Don’t forget a honing rod for daily edge maintenance between major sharpenings.
A leather strop helps polish your blade to razor sharpness. You’ll also want a non-slip base to keep your stone steady and a guide to help maintain consistent angles. Skip the electric sharpeners – they remove too much metal and can damage your knives. Consider investing in an angle guide if you’re just starting out. It’s like training wheels for knife sharpening, helping you develop muscle memory for proper technique.
The Art of Testing Knife Sharpness
Mastering proper knife sharpness testing techniques is crucial for kitchen safety and efficiency. The classic paper test is your first go-to – hold a sheet of paper vertically and try slicing through it cleanly. A sharp blade should glide through without tearing or catching. For a more advanced check, try the tomato test. A properly sharpened knife should slice through tomato skin with minimal pressure, creating clean cuts without crushing the flesh.
The onion test is another reliable method – your blade should slice through onion layers smoothly without pushing or dragging. Remember that different knives require different levels of sharpness. A chef’s knife needs to be razor-sharp for precise cuts, while a bread knife can perform well with slightly less edge refinement. Test your knives regularly, ideally before each major cooking session, to maintain optimal performance.
Different Knife Sharpening Methods Compared
Traditional Whetstone Approach
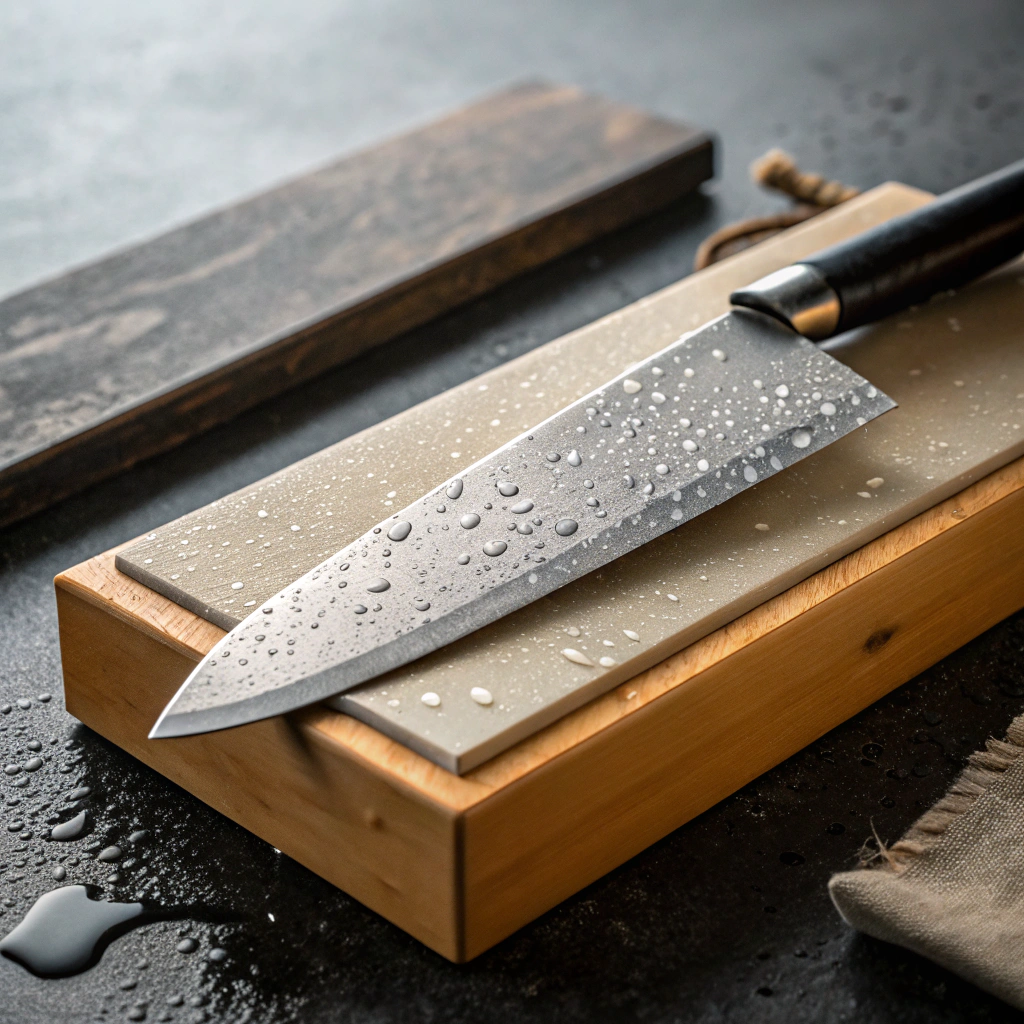
For professional-grade results, the whetstone method stands as the gold standard of knife sharpening. This technique requires a steady hand and patient approach, but delivers exceptional edge retention. Start by soaking your whetstone for 10-15 minutes until no more air bubbles emerge. Position it on a non-slip surface with the coarse grit facing up. Hold your knife at a consistent 20-degree angle and draw it across the stone in smooth, steady strokes, maintaining even pressure throughout. Work from heel to tip, repeating 8-10 times on each side.
Then flip the stone to the finer grit and repeat the process to polish your edge. Remember to check your progress periodically using the knife skills mastery guide to ensure proper technique. This method takes practice but rewards you with razor-sharp blades that stay keen longer.
Electric Knife Sharpeners: Pros and Cons
For busy home cooks, electric knife sharpeners offer a quick solution to dull blades. These countertop devices feature motorized grinding wheels that can restore an edge in minutes. While convenient, they remove more metal than manual methods and may shorten your knife’s lifespan. The best models have multiple stages – coarse for repair, medium for sharpening, and fine for polishing. Position your knife at the preset angle slot and pull through smoothly from heel to tip. Listen for consistent grinding sounds that indicate proper contact.
Most electric sharpeners work well for Western-style knives but aren’t recommended for Japanese blades with specialized angles. If you’re new to knife maintenance, electric sharpeners provide foolproof results. Just be gentle and avoid over-sharpening, which can wear down your blade too quickly. For occasional touch-ups between manual sharpenings, they’re a practical option.
Manual Knife Sharpening Stones: The Traditional Method
For those seeking precise control, whetstones remain the gold standard for knife sharpening. Start with a coarse grit stone (around 1000) to repair chips and establish the edge angle. Keep the blade at a consistent 20-degree angle and use steady, sweeping motions from heel to tip. Listen for the distinctive “swish” sound that indicates proper contact. Progress to medium (3000-4000) and fine (6000+) stones for polishing. Between strokes, feel the edge carefully for burrs – those tiny metal bits that fold over during sharpening.
Remove them by alternating sides with gentler pressure. Finish with a leather strop to align the edge perfectly. While this method requires practice, it gives you complete control over the sharpening process and removes minimal metal, helping your knives last longer. Many professional chefs prefer stones for their reliability and superior results.
Start Sharpening Your Knives Today
Ready to transform your dull knives into razor-sharp kitchen companions? Remember, practice makes perfect. Start with your least expensive knife until you’re comfortable with the technique. Keep your stones clean and stored properly between uses. Your future self will thank you for mastering this essential kitchen skill. Join our community and share your sharpening success stories!