Nutritional values
Servings: 4 ServingCalories:485kcalTotal Fat:15gSodium:890mgTotal Carbohydrate:58gDietary Fiber: 3gSugars: 8gProtein:32g

Oh my goodness, you guys - I can't tell you how many times I've made a teriyaki bowl for my family's dinner! After that crazy-busy soccer practice, there's nothing better than throwing together this crowd-pleasing meal. I discovered my love for teriyaki bowls during college (thanks, local food truck!), and I've spent years perfecting my own version at home. The best part about making a teriyaki bowl is how flexible it is with whatever you've got in the fridge. Last week, I even used leftover grilled veggies, and my picky 10-year-old still cleaned his plate! Let me share everything I've learned about building the perfect bowl.
Listen, friends - the foundation of any amazing teriyaki bowl starts with perfectly cooked rice. I learned this the hard way after serving a mushy disaster to my in-laws (talk about embarrassing!). For the best teriyaki bowl, I always reach for medium-grain Japanese rice or calrose rice. They've got just the right amount of stickiness to hold up under the sauce. Here's my fool-proof method: rinse the rice until the water runs clear (usually 3-4 times), then use a 1:1.2 ratio of rice to water. I've found that letting the rice rest for 10 minutes after cooking makes ALL the difference. And hey, if you're short on time, even regular long-grain rice will work in a pinch!
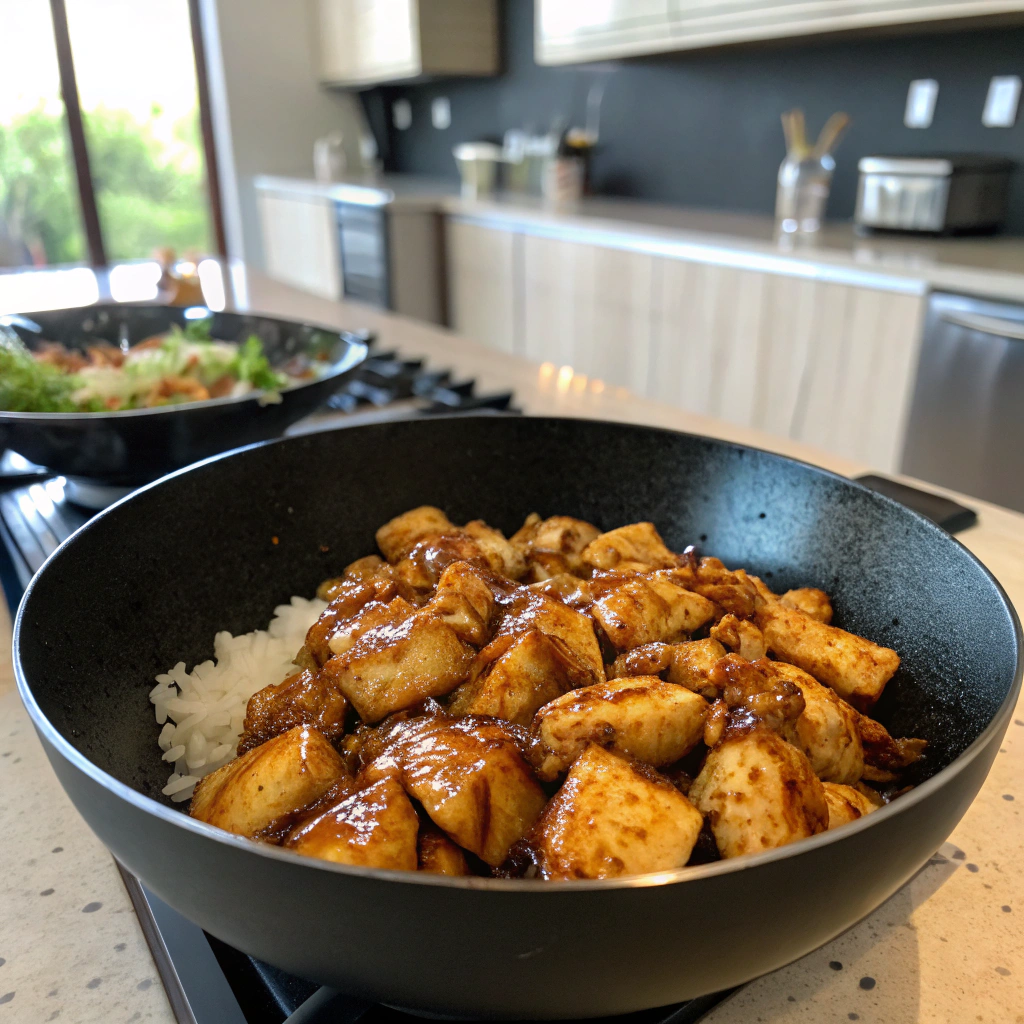
Y'all won't believe how easy it is to ditch the bottle and make your own teriyaki sauce! After years of buying store-bought versions, I stumbled upon this game-changing recipe during a cooking class. For the perfect teriyaki bowl sauce, you'll need soy sauce, mirin (found it at Target!), sake (or rice vinegar works too), and brown sugar. The secret ingredient? A tiny chunk of grated apple - trust me on this one! I combine everything in a small saucepan, let it simmer for about 8 minutes until it's thick enough to coat the back of a spoon, and boom - sauce perfection! Store any leftovers in a mason jar for next week's teriyaki bowl night.
While chicken might be the go-to for a classic teriyaki bowl, let me tell you about some awesome alternatives I've discovered! Last month, I made the most incredible teriyaki bowl using salmon that was on sale at Costco - total game-changer! Firm tofu works beautifully too (just press it really well first). My husband's favorite version uses thinly sliced beef - I grab whatever's on special at the butcher counter. The key is cutting your protein into similar-sized pieces so they cook evenly. Pro tip: if you're meal prepping, cook extra protein on Sunday - it reheats perfectly for teriyaki bowl lunches throughout the week. Just keep the sauce separate until you're ready to eat!
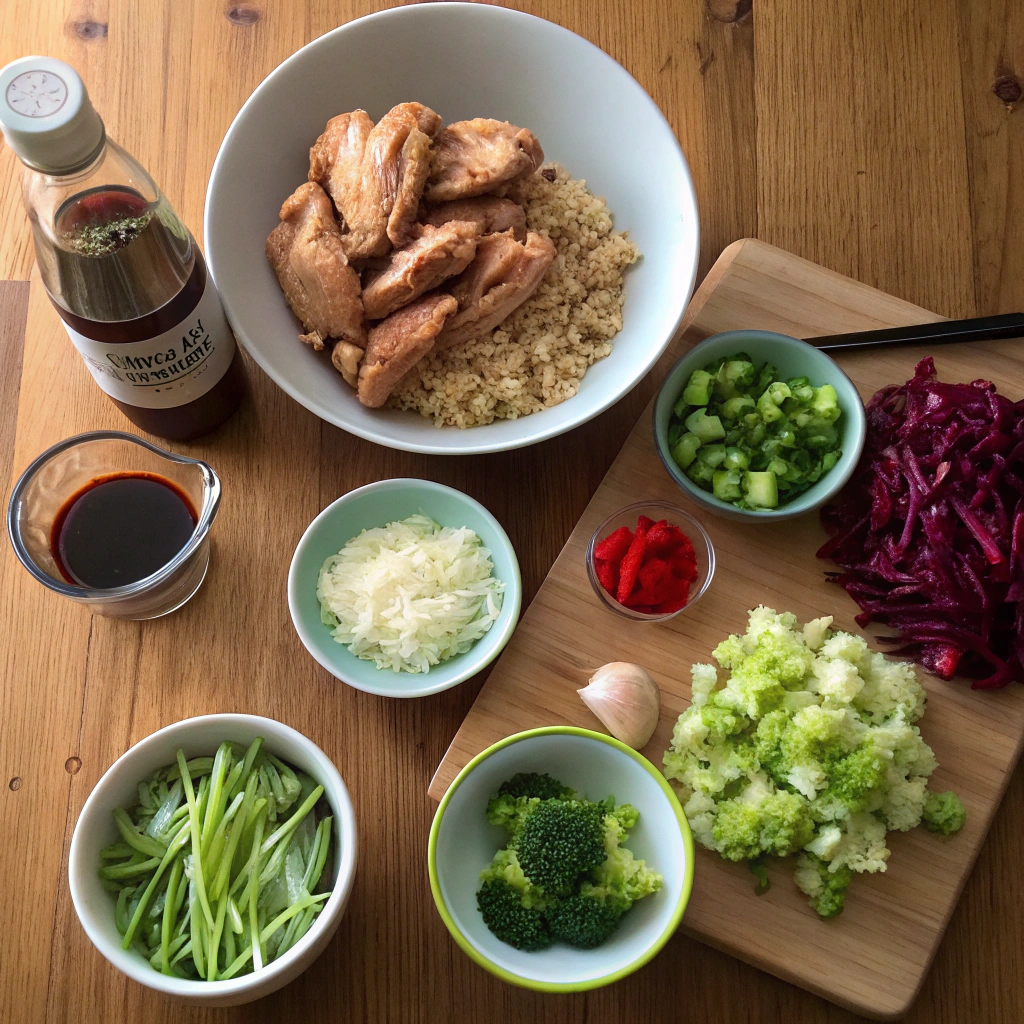
Creating a teriyaki bowl starts with smart shopping. Learning to properly clean fridge space will help you organize your teriyaki bowl ingredients efficiently. I always grab short-grain rice, low-sodium soy sauce, mirin, and brown sugar for the base sauce. Your protein choices can include chicken thighs, salmon, or tofu – I usually prep two types for variety. Don't forget fresh ginger and garlic! For veggies, I stock up on broccoli, carrots, and snap peas that hold up well all week. Green onions and sesame seeds are must-haves for that authentic bowl finish. Pro tip: I learned the hard way to buy pre-cut veggies when time's tight – they're worth the extra cost during busy weeks.
Building the perfect teriyaki bowl gets so much easier with prep work. I dedicate Sunday afternoons to cooking rice in big batches and portioning it out. The signature teriyaki sauce can be mixed and stored in mason jars – it keeps for up to two weeks! Slice and dice your veggies, storing them in separate containers with paper towels to absorb excess moisture. For proteins, I grill or bake them with a light seasoning, then add the teriyaki sauce when reheating. This method keeps everything fresh and prevents the dreaded soggy veggie syndrome.
Smart storage is key for keeping your teriyaki bowl ingredients fresh all week. If you're meal prepping, knowing how to properly store potatoes and other vegetables will help keep your ingredients fresh all week. Store cooked rice in airtight containers – a quick sprinkle of water before reheating brings it back to life. Keep your chopped vegetables in containers lined with paper towels, and always store proteins separately from the sauce. I've found glass containers work best for reheating without any plastic taste. The homemade teriyaki sauce stays fresh in a sealed jar in the fridge. Remember to keep your garnishes, like green onions and sesame seeds, in separate small containers to maintain their crunch.
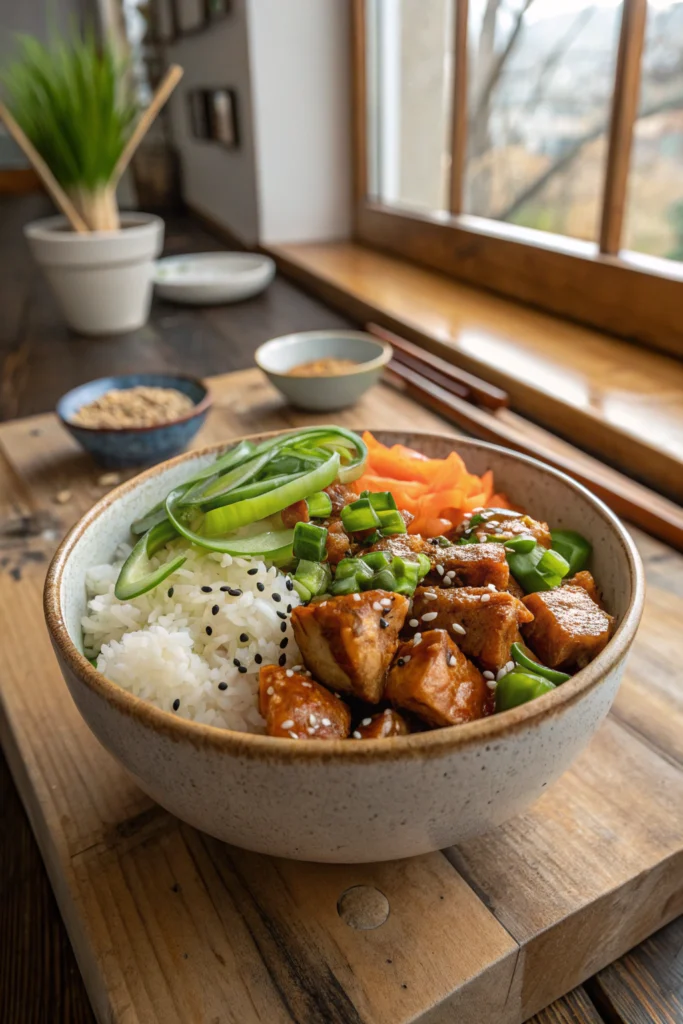
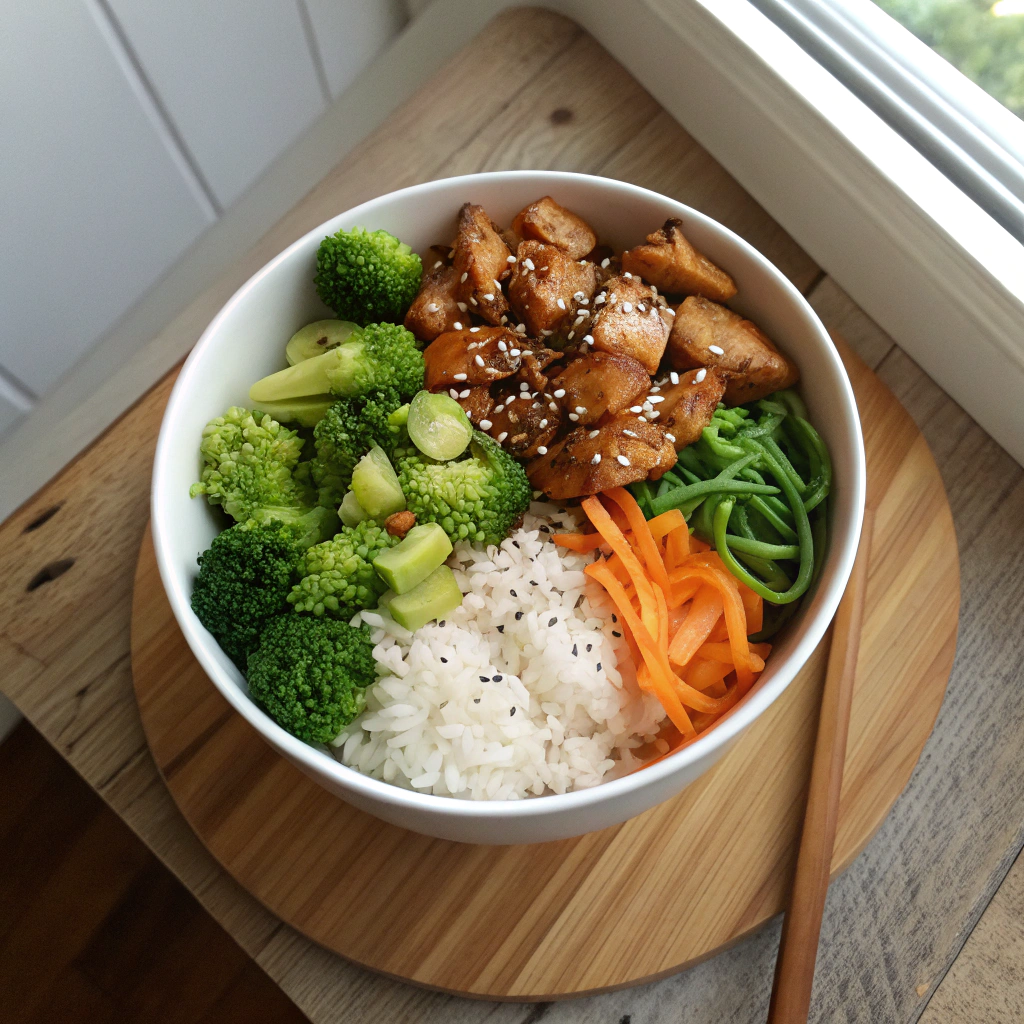
Every great teriyaki bowl needs a rainbow of veggies. I love mixing crispy broccoli florets with julienned carrots and snappy sugar peas. For an extra punch, adding sliced mushrooms brings an amazing umami flavor to your bowl. Bell peppers add both color and crunch, while baby bok choy provides a tender-crisp texture. When making your teriyaki bowl, try roasting half your veggies and keeping the rest raw for varied textures. During summer, I throw in fresh corn kernels for a sweet pop – trust me, it works amazingly well!
Creating the perfect teriyaki bowl is all about balancing textures. Start with fluffy rice as your base – I always rinse it three times for the best results. Layer in your protein, making sure it's not overcooked to maintain tenderness. Mix crunchy raw vegetables with softly sautéed ones for contrast. Adding toasted sesame seeds or crispy onions on top of your teriyaki bowl provides that satisfying crunch factor. I learned that blanching certain veggies, like broccoli, keeps them bright and crisp-tender.
The key to a memorable teriyaki bowl lies in the sauce-to-rice ratio. Start with about two tablespoons of sauce per cup of rice – you can always add more. I like to drizzle half the sauce over the hot rice and let it soak in. The remaining sauce gets distributed over the proteins and vegetables. When assembling your teriyaki bowl, create a small well in the center of the rice for extra sauce to pool. Remember that different proteins absorb sauce differently – chicken needs more than salmon, while tofu benefits from marinating beforehand.
Creating a low-carb teriyaki bowl doesn't mean sacrificing flavor! Instead of traditional rice, try cauliflower rice as your base - it soaks up the teriyaki sauce beautifully while cutting carbs significantly. I've found that roasting the cauliflower rice first gives it a nuttier flavor and better texture for your teriyaki bowl assembly. Another game-changing option is using spiralized zucchini noodles, which add a fresh crunch and natural sweetness to complement your protein choice. My family particularly loves when I mix half cauliflower rice with shirataki noodles for a more substantial feel while keeping things light. Don't forget to double up on colorful veggies like bell peppers and broccoli to make your bowl even more filling and nutritious.
Transforming a classic teriyaki bowl into a plant-based delight is easier than you might think! My go-to protein alternatives include crispy tofu cubes, tempeh strips, or meaty mushrooms like portobello or king oyster varieties. The key to a satisfying vegetarian teriyaki bowl lies in proper protein preparation - press that tofu well and marinate it thoroughly! I love adding edamame for extra protein and snap peas for crunch. One trick I discovered is using coconut aminos instead of traditional soy sauce in your teriyaki sauce for a slightly sweeter profile that works beautifully with plant-based ingredients. Remember to include a variety of textures through different cooking methods.
Building a calorie-conscious teriyaki bowl starts with smart portioning. For a lighter alternative, try making a protein bowl with lean chicken and extra vegetables. I've learned that loading up on vegetables first creates a satisfying base without excessive calories. Start with a modest portion of brown rice or quinoa in your teriyaki bowl, about 1/2 cup cooked. Then pile on steamed broccoli, carrots, and snap peas - they're filling but low in calories. For protein, choose lean options like chicken breast or firm tofu, and measure out your teriyaki sauce rather than freestyle pouring. My secret weapon is adding volume with water-rich vegetables like cucumber and radish, which make the bowl look abundant while keeping calories in check.
The secret to a perfect teriyaki bowl lies in getting that sauce just right! One common mistake is using teriyaki sauce straight from the bottle without adjusting its consistency. I've learned through trial and error that reducing the sauce properly makes all the difference. Start by simmering your teriyaki sauce until it coats the back of a spoon - this creates the ideal consistency for your bowl. If your sauce becomes too thick, whisk in a bit of warm water or pineapple juice. For homemade versions, don't skip the cornstarch slurry, as it helps achieve that restaurant-style glossy finish we all love.
Getting the rice right is crucial for any teriyaki bowl success. The most common mistake I see is not rinsing the rice before cooking - this step removes excess starch and prevents gummy results. When preparing rice for your teriyaki bowl, use the correct water-to-rice ratio (typically 1:1.5 for Japanese-style rice). Another game-changer is letting the rice rest for 10 minutes after cooking before fluffing. I've found that using a rice cooker with a timer helps achieve consistent results. If your rice tends to stick together, try adding a small splash of rice vinegar while it's still hot.
Temperature management can make or break your teriyaki bowl experience. One crucial mistake is serving components at the wrong temperature. For the best teriyaki bowl results, keep hot ingredients hot and cold ingredients cold until the last minute. I always warm my serving bowls with hot water first, then dry them before adding hot rice. When preparing multiple bowls, keep cooked ingredients covered and warm in a low-temperature oven. Don't forget to let your protein rest before slicing to retain juices. Cool components like fresh vegetables should be added just before serving to maintain their crunch.
Ready to create your own amazing teriyaki bowl? Start with the basics and make it your own! Tag us in your photos or drop a comment below with your favorite combinations. Whether you're a beginner or pro, every teriyaki bowl tells a story. Share yours with our cooking community – we'd love to see what you create!
A family-friendly Japanese-American favorite featuring tender chicken thighs glazed in sweet-savory teriyaki sauce, served over fluffy rice with colorful vegetables. Perfect for busy weeknights or meal prep.
Servings: 4 ServingCalories:485kcalTotal Fat:15gSodium:890mgTotal Carbohydrate:58gDietary Fiber: 3gSugars: 8gProtein:32g
Storage:
Keep components separate in airtight containers.
Refrigerate up to 4 days.
Reheating:
Microwave rice with splash of water.
Heat chicken separately.
Substitutions:
Use brown rice, salmon, or tofu instead of chicken.
Serving:
Serve hot, with additional sauce on side if desired.