Nutritional values
Servings: 12 ServingCalories:120kcalTotal Fat:3gSodium:95mgTotal Carbohydrate:23gDietary Fiber: 0gSugars: 12gProtein:1g

Oh my goodness, y'all - let me tell you about my journey with this rice krispie treats recipe! Last weekend, my kids were begging for something sweet, and I was NOT about to turn on the oven in this heat. These no-bake squares have been my go-to since my mom taught me how to make them back in the '90s. You know what's crazy? I've probably made this rice krispie treats recipe hundreds of times, but I still get excited watching those marshmallows melt into that buttery goodness. It's like kitchen magic! The best part? You only need three ingredients and about 10 minutes. Trust me, once you nail these basics, you'll be the neighborhood's treat-making superstar.
Let's talk marshmallows - they're seriously the make-or-break ingredient in any rice krispie treats recipe! After countless batches (and some pretty memorable fails), I've learned that Kraft Jet-Puffed marshmallows are your best bet. They melt like a dream and keep that perfect gooey texture. One time, I tried using generic marshmallows from the dollar store - big mistake! They turned into this weird, stringy mess. For the fluffiest treats, grab a fresh bag - those rock-hard marshmallows from last summer's camping trip won't cut it. And here's my secret weapon: adding a handful of mini marshmallows at the very end gives you those heavenly little pockets of extra sweetness!
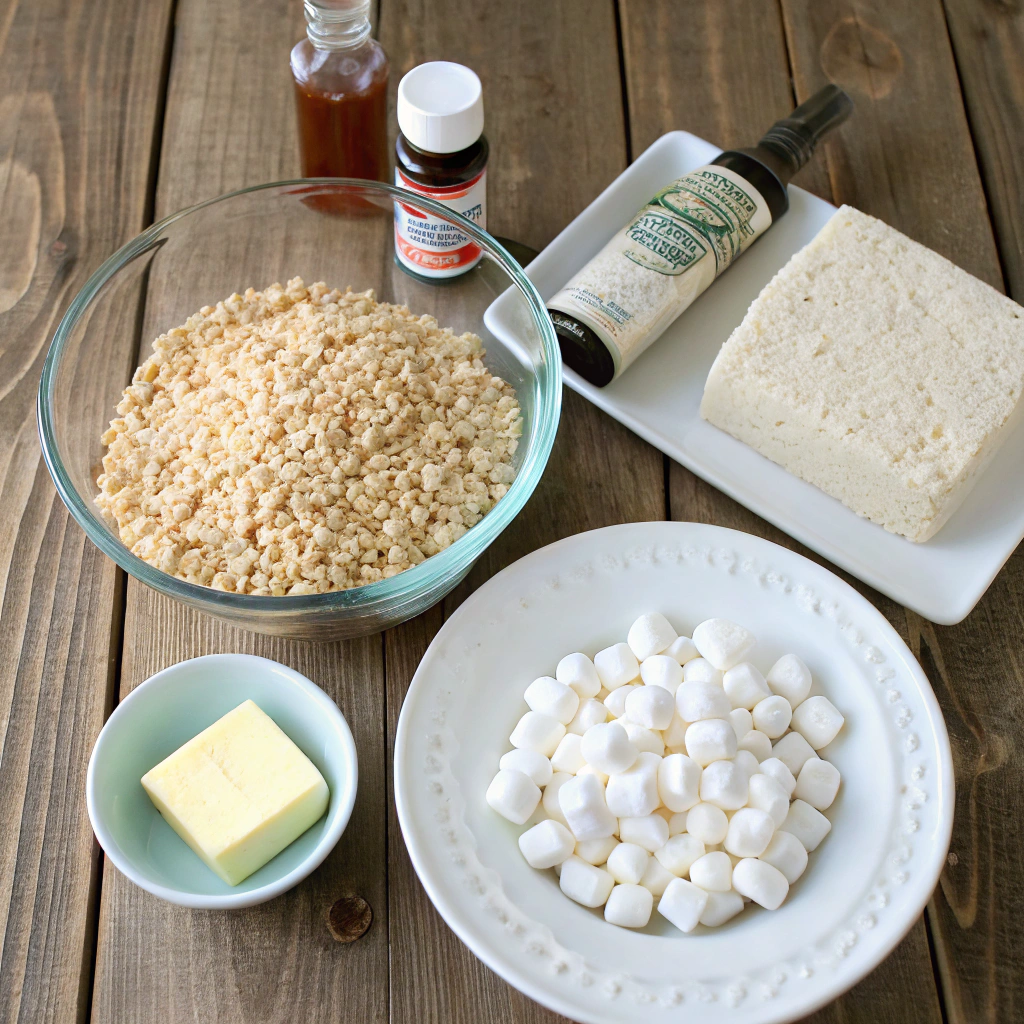
When it comes to making the perfect rice krispie treats recipe, the cereal choice matters way more than you'd think! While the classic Kellogg's Rice Krispies are tried-and-true, I've discovered that store brands can work just as well - and save you a few bucks. Just make sure they're fresh and crispy! Last month, I used a box that had been sitting in my pantry forever, and the treats turned out kind of stale-tasting. Pro tip: give the cereal a quick sniff test before using it in your recipe. If it smells even slightly off, grab a new box. Nobody wants that cardboard taste ruining their treats!
Y'all won't believe the difference butter makes in a rice krispie treats recipe! After years of experimenting, I'm team unsalted butter all the way. Sure, you can use margarine in a pinch - my grandma always did - but real butter gives these treats that rich, creamy flavor that'll have everyone asking for seconds. One summer, I splurged on fancy European butter, and wow, those were some next-level treats! But honestly, any good-quality unsalted butter will do just fine. Just please, please don't use that tub stuff - it's got too much water content and can make your treats soggy. Nobody wants soggy treats!
The key to perfect rice krispie treats starts with properly melted marshmallows. I learned this trick after burning countless batches – use a large, heavy-bottomed pot over medium-low heat. Start by melting your butter completely, then add the marshmallows in batches. Keep stirring constantly with a silicone spatula (metal can scratch your pot). The marshmallows should slowly become smooth and glossy, never brown or scorched. If you're making classic rice krispie treats, patience is crucial here. Don't rush this step by turning up the heat, or you'll end up with tough, hard treats. I like to remove the pot from heat just before the last few marshmallows are completely melted.
When making rice krispie treats, the mixing stage can make or break your results. Once your marshmallows are perfectly melted, add the cereal gradually while folding gently – don't dump it all in at once! This method ensures every crispy piece gets evenly coated. Work quickly but carefully, as the mixture starts setting fast. For extra-gooey treats, I sometimes hold back about a cup of cereal from the traditional recipe. Remember to butter your spatula to prevent sticking. The final mixture should be sticky but manageable, with each piece of cereal clearly visible and coated in marshmallow goodness.
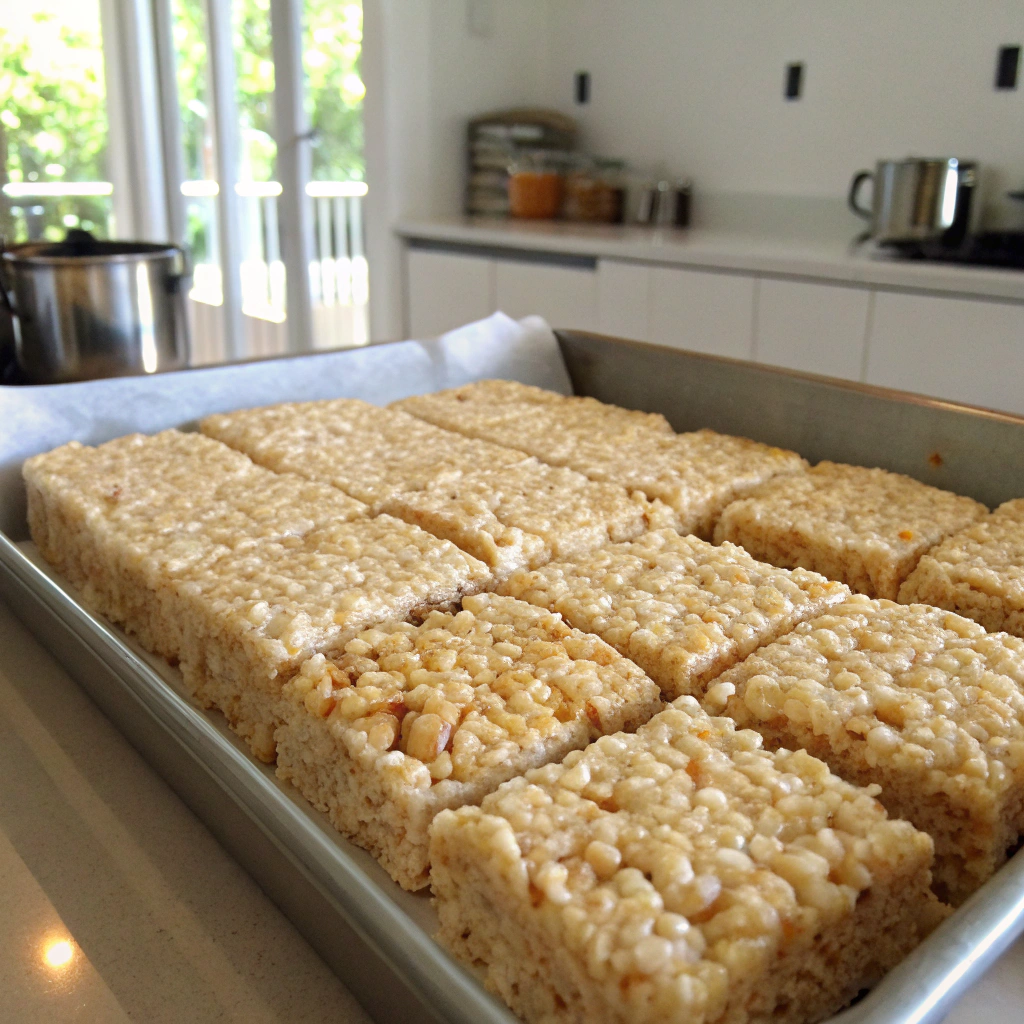
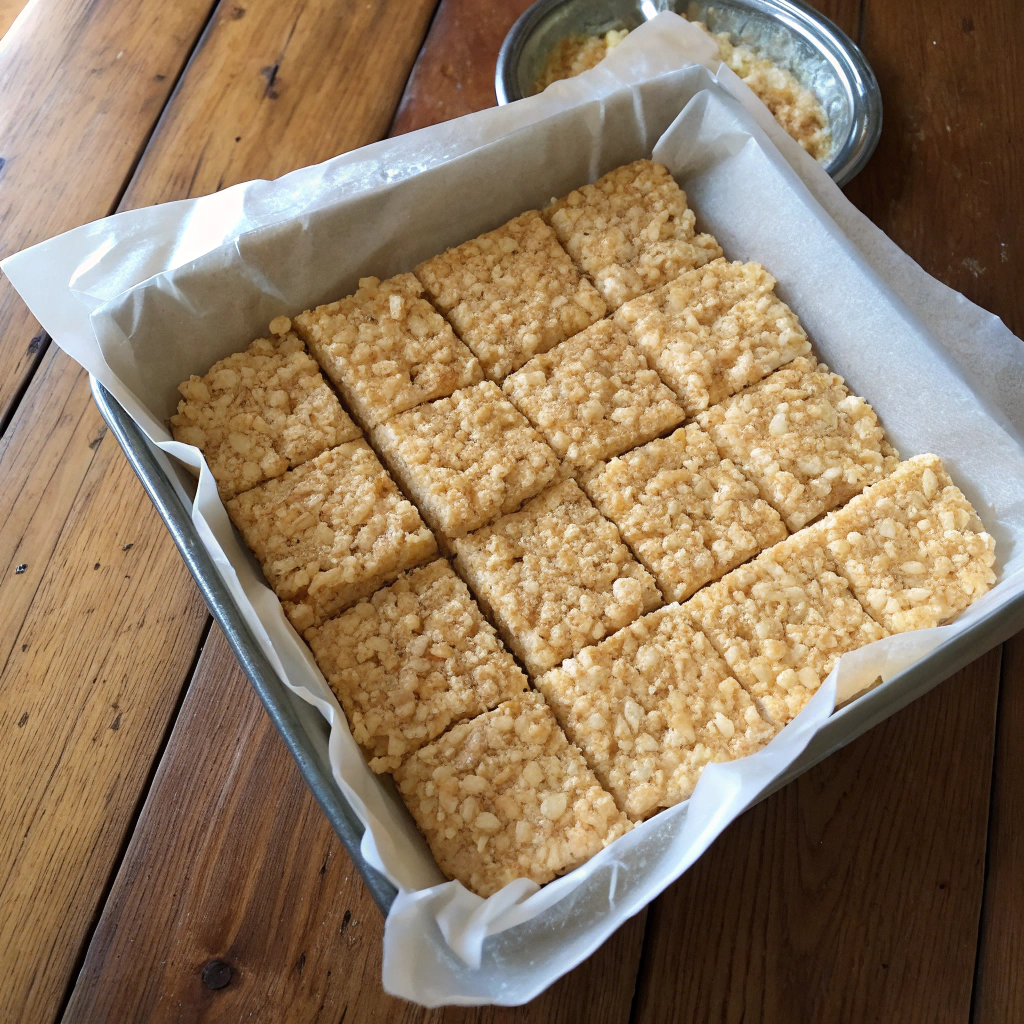
The final step in creating perfect rice krispie treats is all about the press and set. Line your pan with parchment paper and lightly butter it – this prevents sticking and makes removal a breeze. When pressing the mixture into the pan, use buttered hands or a piece of wax paper to prevent sticking. Press firmly but not too hard – you want them compact enough to hold together, but not so dense they become tough. Let them cool at room temperature for about an hour. Don't rush the setting process by refrigerating, as this can make your treats too hard. Once set, cut into squares with a sharp knife.
Taking basic rice krispie treats to the next level is easy with a chocolate coating. After your treats have completely set, cut them into squares or fun shapes. Melt good-quality chocolate in a double boiler or microwave in short bursts, stirring frequently. Dip each treat halfway into the melted chocolate, then place on parchment paper. For extra flair, sprinkle with crushed nuts, sprinkles, or sea salt before the chocolate sets. While these treats are delicious on their own, they also pair wonderfully with other classic desserts like german chocolate cake for special occasions. These elevated rice krispie treats make perfect party desserts or holiday gifts. Store them in an airtight container with wax paper between layers.
Transform classic rice krispie treats into festive holiday creations throughout the year. For Halloween, add orange food coloring and form into pumpkin shapes. Christmas calls for green and red sprinkles mixed into your traditional rice krispie treats recipe, or try forming them into wreath shapes with green-tinted coconut. Valentine's Day is perfect for heart-shaped treats with pink drizzle, while Easter brings pastel colors and egg shapes. Add seasonal candies or colored marshmallows to match your holiday theme. These versatile treats adapt beautifully to any celebration.
Personalizing your rice krispie treats with mix-ins creates endless possibilities. Start with the basic recipe, then add crushed Oreos, mini chocolate chips, or chopped nuts while mixing. Peanut butter lovers can swirl in some creamy peanut butter with the melted marshmallows. For a tropical twist, try adding toasted coconut and dried pineapple to your rice krispie treats mixture. Candy pieces like M&Ms or chopped candy bars work great too. Just remember to add mix-ins after the marshmallows are melted but before the mixture cools too much.
Nobody wants to bite into a brick-hard rice krispie treat! If your treats turn out too hard, you're probably cooking your marshmallows too long or at too high heat. When making rice krispie treats, melt your marshmallows slowly over medium-low heat, stirring constantly. Overcooking makes the sugar crystallize, creating that unwanted hardness. Another common mistake is pressing the mixture too firmly into the pan. You want to gently spread the cereal mixture – don't compact it like you're building a fortress! Remember, these beloved treats should have a soft, slightly chewy texture. Adding a little extra butter (about 2 tablespoons more than your recipe calls for) can help keep them tender.
Making the perfect rice krispie treats is all about balance. If yours turn out too sticky, you probably didn't use enough cereal or added too many marshmallows. The classic rice krispie treats recipe calls for a specific ratio of marshmallows to cereal for good reason! Try adding an extra cup of cereal next time if stickiness is an issue. Another trick is to butter your hands lightly before pressing the mixture into the pan. This prevents sticking and makes the whole process much easier. If you're in a humid climate, consider adding a touch more cereal, as moisture in the air can affect the final texture.
The key to maintaining fresh-tasting rice krispie treats is proper storage. Always let them cool completely before storing to prevent condensation, which can make them soggy. Layer them between sheets of wax paper in an airtight container – this keeps them from sticking together. At room temperature, properly stored treats stay fresh for about 2-3 days. If your kitchen is particularly warm, you might want to keep them in the fridge, where they'll last up to a week. Just remember to bring them back to room temperature before serving for the best texture. Never store them near strong-smelling foods, as they can absorb odors.
To keep your rice krispie treats tasting fresh, proper storage is crucial. Start by cutting them into squares once they've completely cooled – this makes them easier to store and serve later. Place the treats in an airtight container, separating layers with wax paper or parchment. If you're planning to store them for more than a day, consider wrapping individual pieces in plastic wrap first. This extra step helps prevent them from drying out and maintains their chewy texture. Keep them at room temperature unless your kitchen is very warm. Avoid storing them in the refrigerator unless absolutely necessary, as cold temperatures can make them harder.
Yes, you can freeze rice krispie treats! When properly wrapped, these sweet treats maintain their quality in the freezer for up to 6 weeks. To freeze them, first cut your rice krispie treats into individual servings. Wrap each piece tightly in plastic wrap, then place them in a freezer-safe container or zip-top bag. Remove as much air as possible to prevent freezer burn. When you're ready to enjoy them, let the treats thaw at room temperature for about an hour. Don't try to speed up the process in the microwave, as this can make them tough and chewy in all the wrong ways
Even the best rice krispie treats can get stale, but don't toss them out just yet! To revive slightly stale treats, place them on a microwave-safe plate and heat in 5-second intervals. Watch them carefully – you just want to warm them slightly, not melt them completely. Another method is to place them in a sealed container with a slice of bread overnight; the moisture from the bread will help soften them up. For best results, make your rice krispie treats in smaller batches that you can enjoy within a few days. Remember, fresh is always best when it comes to these classic treats!
Making amazing rice krispie treats is easier than you think! Grab a large pot, a sturdy spoon, and a baking pan - that's really all you need. Prep your pan first, keep your ingredients ready, and work quickly once the marshmallows melt. Try adding different mix-ins like sprinkles or chocolate chips for fun variations. Remember to share your creations with us in the comments below! For a delightful dessert pairing, try serving these treats alongside a chocolate mousse for an impressive dessert spread.
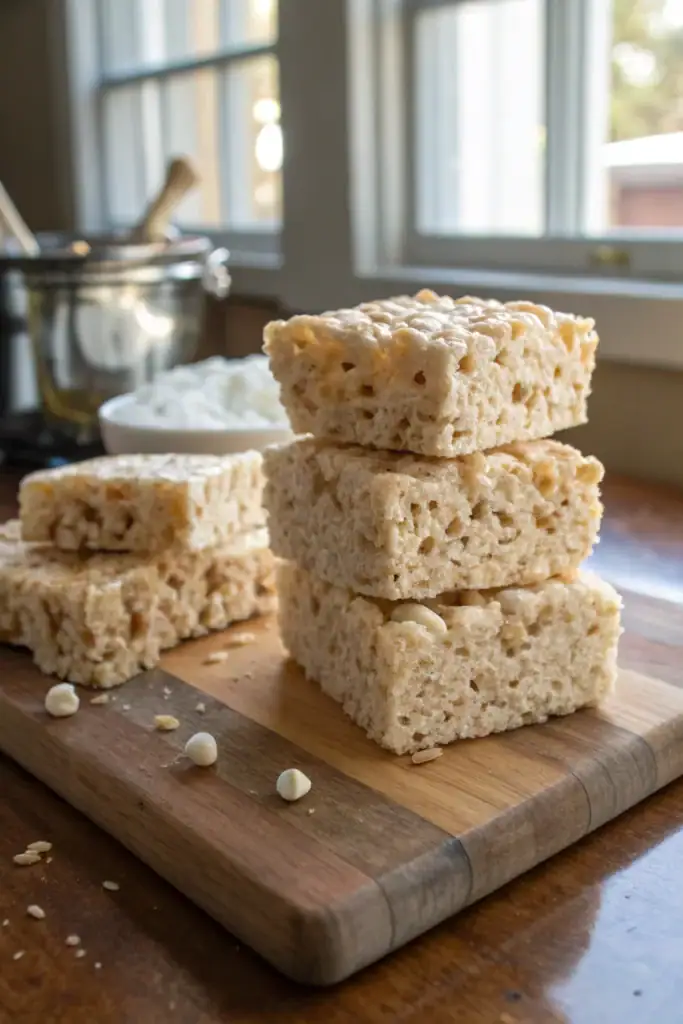
Perfectly gooey, wonderfully chewy marshmallow treats that come together in minutes. This foolproof recipe creates the ideal balance of crispy cereal and marshmallow goodness that'll make everyone smile.
Servings: 12 ServingCalories:120kcalTotal Fat:3gSodium:95mgTotal Carbohydrate:23gDietary Fiber: 0gSugars: 12gProtein:1g
Storage:
Keep in an airtight container at room temperature for up to 3 days. Place wax paper between layers to prevent sticking.
Substitutions:
Can use margarine instead of butter. Generic crispy rice cereal works fine. For gluten-free version, use certified gluten-free crispy rice cereal.
Serving suggestion:
Cut into 2-inch squares. Serve at room temperature for best texture.