Oreo Cheesecake Recipe

Servings: 12 Total time: 7 hrs 30 mins Difficulty level: Intermediate
Velvety smooth cheesecake loaded with Oreo cookies
Oreo cheesecake with creamy swirled border and crushed cookie topping on ceramic stand, drool-worthy dessert. pinit

Oh my goodness, y’all – let me tell you about this Oreo cheesecake that’s been driving my family absolutely crazy! Last weekend, I was craving something decadent and whipped up this recipe for my daughter’s soccer team party. The entire cake disappeared in minutes! There’s something magical about combining velvety cheesecake with those iconic chocolate sandwich cookies. 

This Oreo cheesecake recipe has become my go-to dessert for potlucks and family gatherings. After tons of testing (and happy taste-testers!), I’ve perfected every step. Trust me, even if you’re new to baking cheesecakes, you’ll nail this one. For another decadent dessert option, try our easy chocolate mousse recipe that’s just as impressive but takes only 15 minutes to prepare. The crunchy cookie crust, creamy filling, and generous Oreo chunks throughout make this dessert totally irresistible.

Essential Ingredients for Perfect Oreo Cheesecake

Choosing the Right Cream Cheese Brands

Let’s talk cream cheese – the star of any good Oreo cheesecake! I’ve learned the hard way that not all brands are created equal. Philadelphia has always been my ride-or-die for the smoothest, creamiest cheesecake texture. Whatever you do, avoid those low-fat versions – they’ll leave your Oreo cheesecake with a weird, grainy texture. Always grab full-fat blocks, not the spreadable kind in tubs. Here’s my pro tip: let your cream cheese sit out for at least 2 hours before mixing. Room temperature cream cheese is essential for that silky-smooth filling without any pesky lumps. I usually set mine out while I’m having my morning coffee!

Best Oreo Varieties for Cheesecake Base

When it comes to making the perfect Oreo cheesecake, regular Oreos are your best friend. I once tried using Double Stuf in my crust, and boy, was that a greasy mistake! The extra cream filling throws off the texture completely. Stick with original Oreos – they create that perfect cookie-to-cream ratio in both the crust and filling. For crushing, pop them in a zip-top bag and go to town with your rolling pin (super therapeutic after a long day!). Just don’t pulverize them into dust – you want some chunky bits for texture. And save those perfectly crushed pieces for the filling of your cheesecake too!

Must-have Tools and Equipment

Making an amazing Oreo cheesecake doesn’t require fancy equipment, but there are some basics you absolutely need. First up: a reliable 9-inch springform pan – don’t even think about using a regular cake pan! I learned that lesson the hard way trying to serve my first cheesecake at Christmas. You’ll also want a good stand mixer or hand mixer (your arms will thank you), and definitely grab a rubber spatula for scraping down those bowl sides. One game-changing tool I swear by is an instant-read thermometer – it takes all the guesswork out of knowing when your Oreo cheesecake is perfectly baked.

Mastering Your No-Bake Oreo Cheesecake

Quick 15-Minute Oreo Crust Method

Oreo cheesecake crust being pressed into springform pan, showcasing even thickness and clean edges against dark chocolate contrast.

Creating a perfect Oreo cheesecake starts with getting the crust just right. I’ve found that pulsing whole Oreos (filling and all!) in a food processor gives you the best texture – no need to scrape out the cream filling! For extra crunch, I like crushing a few cookies by hand and mixing them in. The secret is pressing the mixture firmly into your pan using the bottom of a measuring cup. A little melted butter helps bind everything together, but don’t overdo it or your crust might become too greasy. I learned this the hard way after several soggy-bottomed attempts!

Achieving the Perfect Filling Texture

Making the filling for your Oreo cheesecake is all about temperature and timing. Start with cream cheese that’s properly softened – I leave mine out for at least 2 hours before mixing. This prevents those pesky lumps that can ruin the smooth texture we’re after. Fold in crushed Oreos gently at the end to keep their texture intact. My favorite trick is using a combination of heavy cream and cream cheese for that perfect mousse-like consistency. Remember to scrape down the sides of your bowl frequently while mixing to ensure everything blends evenly.

Setting Time and Temperature Tips

The setting process is crucial for your no-bake Oreo cheesecake to hold its shape. After pouring the filling into your crust, refrigerate for at least 6 hours, though overnight is even better. I’ve found that placing the cheesecake towards the back of your fridge, where it’s coldest, helps it set more firmly. For clean slices, dip your knife in hot water and wipe it dry between cuts. If you’re looking for more dessert inspiration, our german chocolate cake recipe is another crowd-pleasing favorite that combines rich chocolate with delicious texture. If you’re in a hurry, pop it in the freezer for 30 minutes before serving, but don’t forget to take it out – a frozen cheesecake isn’t what we’re going for!

Classic Baked Oreo Cheesecake Guide

Water Bath Techniques for Crack-Free Results

The key to a perfect baked Oreo cheesecake lies in using a proper water bath. I wrap my springform pan in three layers of heavy-duty foil, making sure there are no gaps where water could seep in. Pour hot water halfway up the sides of the pan after placing it in a larger baking dish. This gentle cooking method prevents cracks and helps your cheesecake bake evenly. The steam from the water bath creates a humid environment that’s ideal for achieving that signature creamy texture we all love in a classic cheesecake.

Temperature Control Secrets

Your Oreo cheesecake needs careful temperature monitoring throughout the baking process. Start at 350°F for the first 15 minutes, then reduce to 325°F for the remaining time. I always keep an oven thermometer handy since oven temperatures can vary widely. Watch for the slight wobble in the center – it should jiggle like Jell-O but not be liquid. Avoid opening the oven door too often, as temperature fluctuations can lead to cracks. The gradual temperature changes help maintain that smooth, creamy texture we’re aiming for.

Cooling and Setting Process

Oreo cheesecake with crushed oreos, perfectly baked with golden edges and jiggly center, beautifully plated.

Letting your Oreo cheesecake cool properly is just as important as baking it. Once it’s done, turn off the oven and crack the door open slightly, letting it cool gradually for about an hour. This prevents the dramatic temperature change that can cause sinking or cracking. After the initial cooling, move it to room temperature for another hour before refrigerating. I like to place a paper towel over the top (not touching the surface) to prevent condensation from forming. Give it at least 4 hours in the fridge, though overnight chilling gives the best flavor and texture.

Creative Oreo Cheesecake Variations

Mini Oreo Cheesecake Bites

Who doesn’t love bite-sized treats? These adorable mini Oreo cheesecake bites are perfect for parties and potlucks. Start with a standard Oreo cheesecake base, but scale it down into a mini muffin tin for individual servings. I’ve found that one Oreo cookie fits perfectly as the crust in each cup! The creamy filling gets extra texture from crushed cookies mixed right in. My kids go crazy for these portable treats, and they’re so much easier to serve than a full-sized cheesecake. Pro tip: freeze these little guys for up to 3 months – they thaw beautifully and taste just as fresh as day one. Just remember to store them in an airtight container to prevent freezer burn.

Marble and Swirl Patterns

Creating beautiful swirls in your Oreo cheesecake isn’t just for looks – it adds amazing texture too! Start with your classic cheesecake batter, then separate about a third into another bowl. Mix crushed Oreos into this portion until it’s dark and chocolatey. When you’re ready to pour, add both batters in alternating dollops. Use a knife or skewer to create gorgeous swirls by gently dragging through the mixture. Don’t overdo it though – you want distinct patterns, not a muddy mix! I learned this technique from my grandmother, who always said the key to perfect marbling is using room temperature ingredients and a light touch.

Seasonal Oreo Flavor Combinations

Take your Oreo cheesecake game to new heights by incorporating seasonal cookie flavors! During winter, try the peppermint Oreos for a festive twist on the classic recipe. Spring calls for the lemon variety, creating a bright, citrusy cheesecake that’s absolutely refreshing. Summer brings birthday cake Oreos, perfect for celebration desserts. Fall is my favorite – pumpkin spice Oreos make an incredible autumn-themed cheesecake that’ll have everyone asking for seconds. Just swap out regular Oreos in your base recipe with these seasonal varieties. The filling flavors complement the traditional cheesecake perfectly without overpowering it.

Decorating Your Oreo Cheesecake

Oreo cheesecake with creamy whipped cream rosettes, Oreo crumbs, centered whole Oreo cookie on rustic wooden table.

Whipped Cream Piping Techniques

Making your Oreo cheesecake look professional starts with perfectly piped whipped cream. I’ve discovered that chilling your piping bag and tip in the freezer for 15 minutes before starting makes a huge difference. Create a stable whipped cream by adding a touch of cream cheese to prevent weeping. When decorating your cheesecake, start from the outside and work your way in with consistent pressure. I love adding mini Oreos between rosettes for extra flair! Remember to pipe your decorations just before serving for the freshest look. For special occasions, try tinting your whipped cream with gel food coloring to match your party theme.

Oreo Crumb Garnish Ideas

Transform your Oreo cheesecake with creative crumb garnishes that add both texture and visual appeal. Pulse whole cookies in a food processor until you get a mix of fine crumbs and small chunks. Sprinkle these around the edges of your cheesecake for a professional finish. Try pressing the crumbs halfway up the sides for a dramatic look. I love creating patterns on top using paper stencils – hearts, stars, or even words! For extra crunch, mix some crushed Oreos with melted chocolate, let it set, then break it into shards for an eye-catching topper. These garnishes work great for hiding any small cracks too!

Make-Ahead Decoration Tips

Planning ahead makes decorating your Oreo cheesecake so much easier! Prepare your cookie crumbs and store them in an airtight container up to a week before. Make chocolate decorations by melting chocolate, piping designs onto parchment paper, and freezing until needed. I’ve learned to keep a stash of mini Oreos hidden away (where my family can’t find them!) specifically for garnishing. Prepare your whipped cream base the day before, but wait to whip it until just before decorating. Store your finished cheesecake in the fridge, but add final touches like fresh whipped cream within two hours of serving.

Share Your Oreo Cheesecake Success

This Oreo cheesecake recipe is meant to be shared! Store leftovers in an airtight container and serve chilled for the best texture. For parties, pre-slice into 12-16 portions and add fresh whipped cream just before serving. Don’t forget to snap a photo of your creation – natural light works best for capturing that creamy texture. Tag us in your baking adventures and let us know how it turned out!

Oreo Cheesecake Recipe

A rich, creamy cheesecake packed with crushed Oreos in every bite. The chocolate cookie crust and cream cheese filling create the perfect balance of crunch and smoothness, while chunks of Oreos throughout add delightful texture.

Preparation time 30 mins Cooking time 60 mins Resting time 6 hrs Total time 7 hrs 30 mins Difficulty level: Intermediate Servings: 12 Calories: 450 Best saison: Suitable throughout the year

Ingredients

Cooking Mode Disabled

For the Crust:

For the Filling:

For Topping:

Instructions

Prepare the Pan

  1. Wrap outside of a 9-inch springform pan with foil
  2. Preheat oven to 325°F
    Make sure foil covers bottom and sides completely
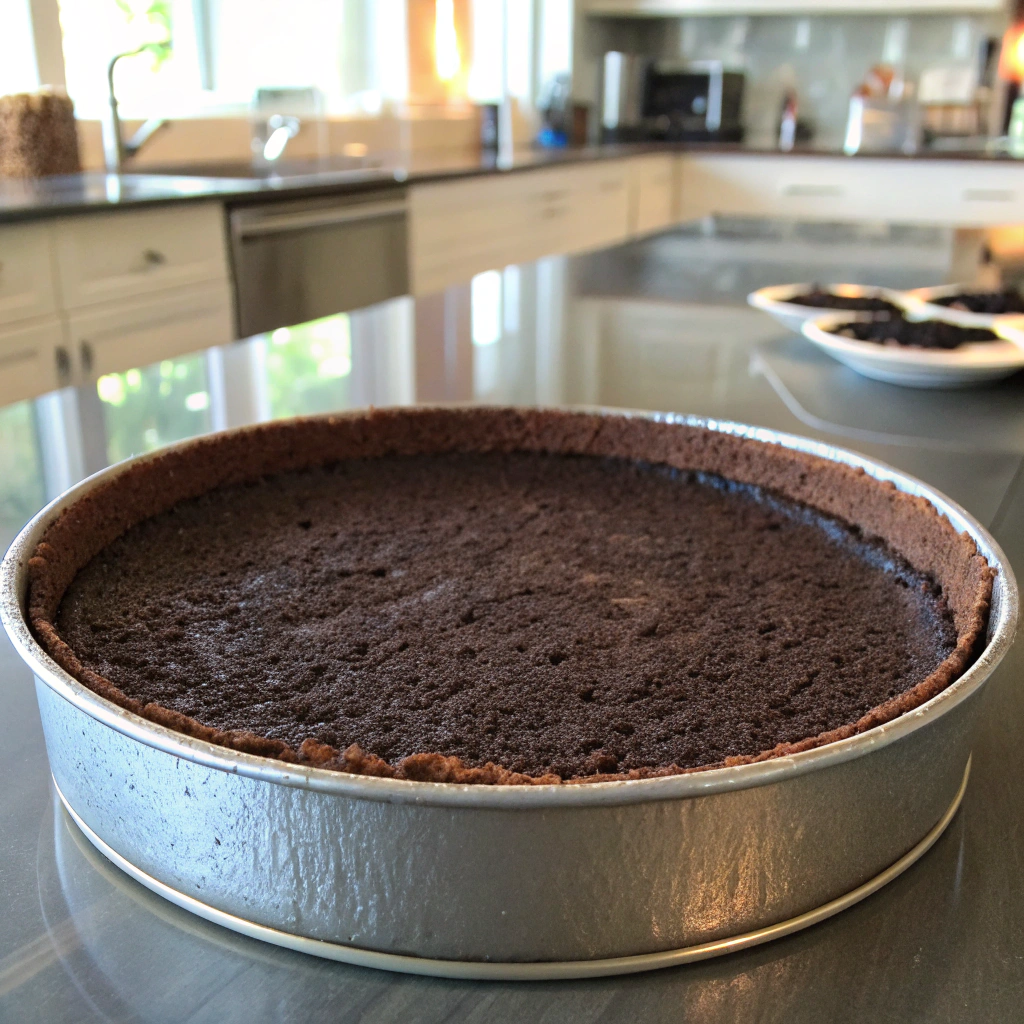
Make the Crust

  1. Pulse 24 Oreos in food processor until fine crumbs
  2. Mix with melted butter until combined
  3. Press mixture into bottom of pan
    Use flat-bottomed measuring cup for even pressing

Create the Filling

  1. 3-4 minutes
    Beat cream cheese until smooth
  2. Add sugar gradually, beating until fluffy
  3. Add eggs one at a time, mixing well
  4. Fold in sour cream and vanilla
  5. Gently stir in chopped Oreos
    Mixture should be smooth with no cream cheese lumps

Bake the Cheesecake

  1. Pour filling into prepared crust
  2. Place in water bath, halfway up sides
  3. Bake 60-70 minutes until edges are set but center jiggles slightly
    Don't overbake - cheesecake will continue setting as it cools

Cool and Set

  1. Turn off oven, crack door open
  2. Let cool in oven 1 hour
  3. Refrigerate 6 hours or overnight
    Cover with paper towel then foil to prevent condensation
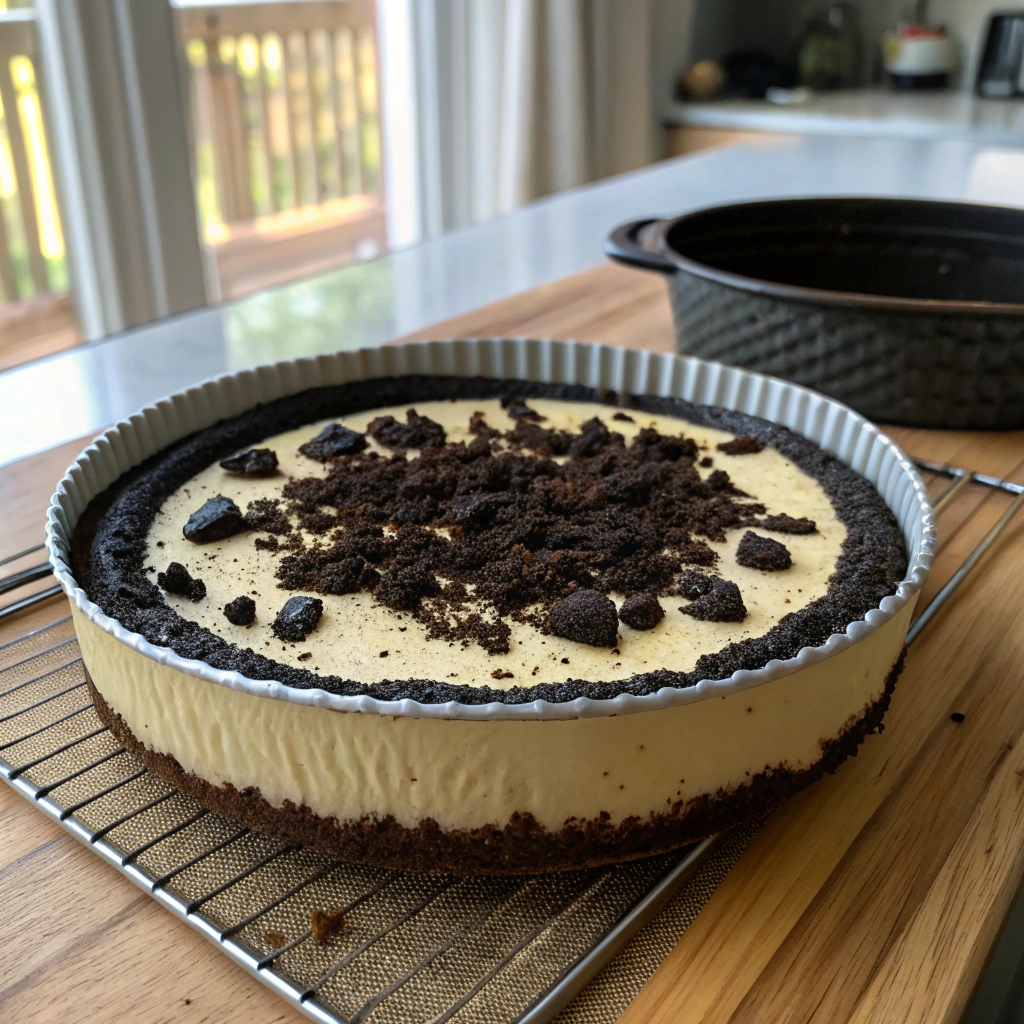
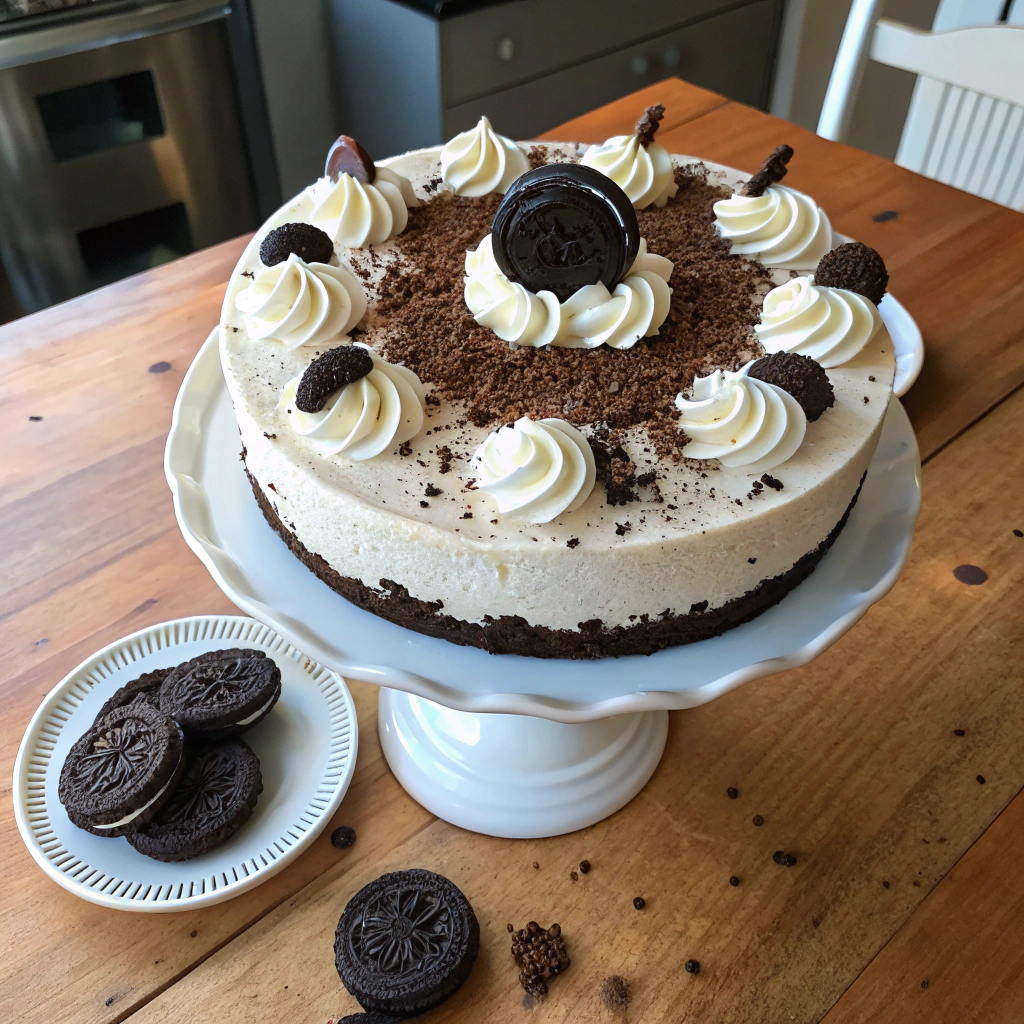
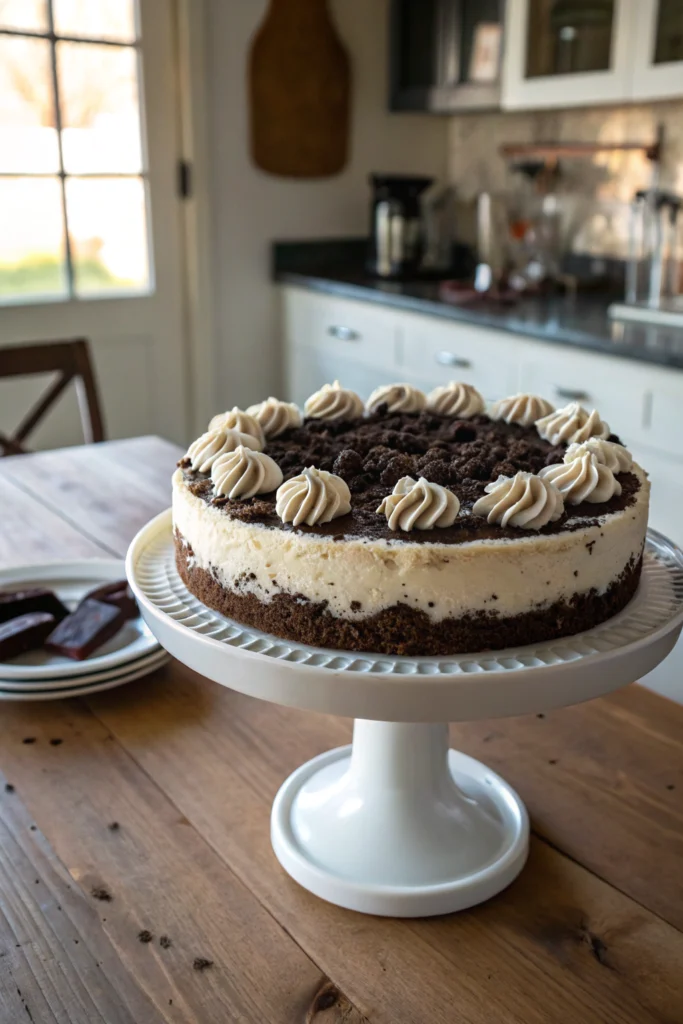
Decorate and Serve

  1. Whip cream with powdered sugar
  2. Top with whipped cream and crushed Oreos
  3. Refrigerate until serving
    Slice with hot knife for clean cuts

Nutritional values

Servings: 12 ServingCalories:450kcalTotal Fat:32gSodium:320mgTotal Carbohydrate:38gDietary Fiber: 1gSugars: 28gProtein:7g

Note

Storage:
Keep refrigerated up to 5 days.
Can be frozen for up to 3 months wrapped well.
Substitutions:
Use light cream cheese if preferred (texture will be different).
Gluten-free Oreos work well for GF version.
Serving:
Best served chilled.
Let frozen cheesecake thaw overnight in refrigerator.

Keywords: oreo cheesecake, chocolate cheesecake, cookie cheesecake, no-bake dessert
Rate this recipe:
Recipe Card powered by WP Delicious

Common Oreo Cheesecake Questions

Expand All:
Why Did My Oreo Cheesecake Crack?

Cracks in your Oreo cheesecake usually happen from overmixing or sudden temperature changes. Start with room temperature ingredients and mix just until combined - overbeating adds too much air. Use a water bath while baking and let the cheesecake cool gradually in the oven with the door cracked. Even if it cracks, don't worry! Top it with whipped cream or crushed Oreos, and it'll taste just as amazing.

Can I Freeze This Cheesecake?

Yes! Oreo cheesecake freezes beautifully for up to 3 months. Let it cool completely, then wrap the whole cake (or individual slices) in plastic wrap and foil. I like cutting it into portions before freezing - this makes it super convenient for last-minute desserts. Thaw overnight in the fridge, never at room temperature. The cookie crust might be slightly less crunchy, but the flavor stays perfect.

How Long Does Oreo Cheesecake Last?

Your Oreo cheesecake will stay fresh in the fridge for 5-7 days when stored properly in an airtight container. The cookie crust might soften slightly after day 3, but the taste remains delicious. I always place a paper towel under the lid to absorb excess moisture. For best results, keep it away from strong-smelling foods and serve within the first few days.

Best Way to Cut Oreo Cheesecake

For clean slices of Oreo cheesecake, dip a large sharp knife in hot water and wipe it dry between each cut. This prevents the creamy filling from sticking. I find that cutting straight down (not sawing) works best. If the cheesecake is frozen for 15-20 minutes before slicing, you'll get even neater results. Remember to remove the parchment paper from the bottom before serving.

Can I Use Low-Fat Ingredients?

While you can make Oreo cheesecake with low-fat cream cheese and sour cream, the texture won't be as rich and creamy. The fat content helps create that classic cheesecake consistency we all love. If you do use lighter ingredients, reduce the baking time slightly since they contain more water. I've found that using full-fat cream cheese with light sour cream offers the best compromise.

Rate this recipe
Rate this recipe

Add a question

Min

Share it on your social network