Nutritional values
Servings: 4 ServingCalories:220kcalTotal Fat:8gSodium:590mgTotal Carbohydrate:35gDietary Fiber: 3gSugars: 1gProtein:4g

Oh my goodness, y'all - let me tell you about my obsession with griddle hashbrowns! After countless Sunday morning fails (and way too many burnt potatoes), I finally cracked the code. Making perfect griddle hashbrowns isn't rocket science, but there are definitely some tricks you need to know. Last weekend, I had my in-laws over for brunch, and these crispy spuds were the star of the show. The secret? It's all about the right tools and technique. Whether you're cooking up breakfast for a crowd or just treating yourself to a cozy morning in, mastering griddle hashbrowns will seriously up your breakfast game. Trust me, once you nail these golden-brown beauties, you'll never go back to the frozen kind!
Listen, I learned this one the hard way - not all griddles are created equal when it comes to making killer hashbrowns! After trying everything from my grandma's cast iron to those fancy electric griddles, I've got some real talk for you. For the best griddle hashbrowns, you want a flat top that heats evenly and has enough space to spread those shredded potatoes nice and thin. If you're new to griddle cooking, these blackstone recipes will help you master various techniques while perfecting your hashbrowns. I swear by my 24-inch steel griddle - it's been a game-changer for my weekend cooking. The key is finding one with a good weight and thickness that won't warp over high heat. And here's a pro tip: look for one with a slight lip around the edges to keep those potato shreds from escaping!
You know what drives me nuts? When half my griddle hashbrowns stick to the cooking surface because I skimped on quality tools. Been there, done that! A sturdy metal spatula with a beveled edge is absolutely essential - I keep two on hand because flipping those crispy spuds is basically a two-handed dance. The real MVP in my kitchen is my wide griddle scraper. It's perfect for gathering those loose potato pieces and creating those restaurant-style crispy edges everyone fights over. Just make sure your spatulas are wide enough to support the hashbrowns during flipping. Nothing's worse than watching your perfectly golden creation fall apart mid-air (speaking from embarrassing experience here!).
Getting the heat just right for griddle hashbrowns is like trying to hit the sweet spot on your car's AC - it takes some practice! I always keep an infrared thermometer in my apron pocket (best $20 I ever spent on Amazon, by the way). The perfect temp for hashbrowns is around 350-375°F, and trust me, guessing doesn't cut it. I also use heat-resistant gloves because those griddle handles get crazy hot. Speaking of temperature control, a good timer helps too - I can't tell you how many times I've gotten distracted by my coffee and forgotten about the hashbrowns until that familiar "too crispy" smell hits. Learn from my mistakes, folks!
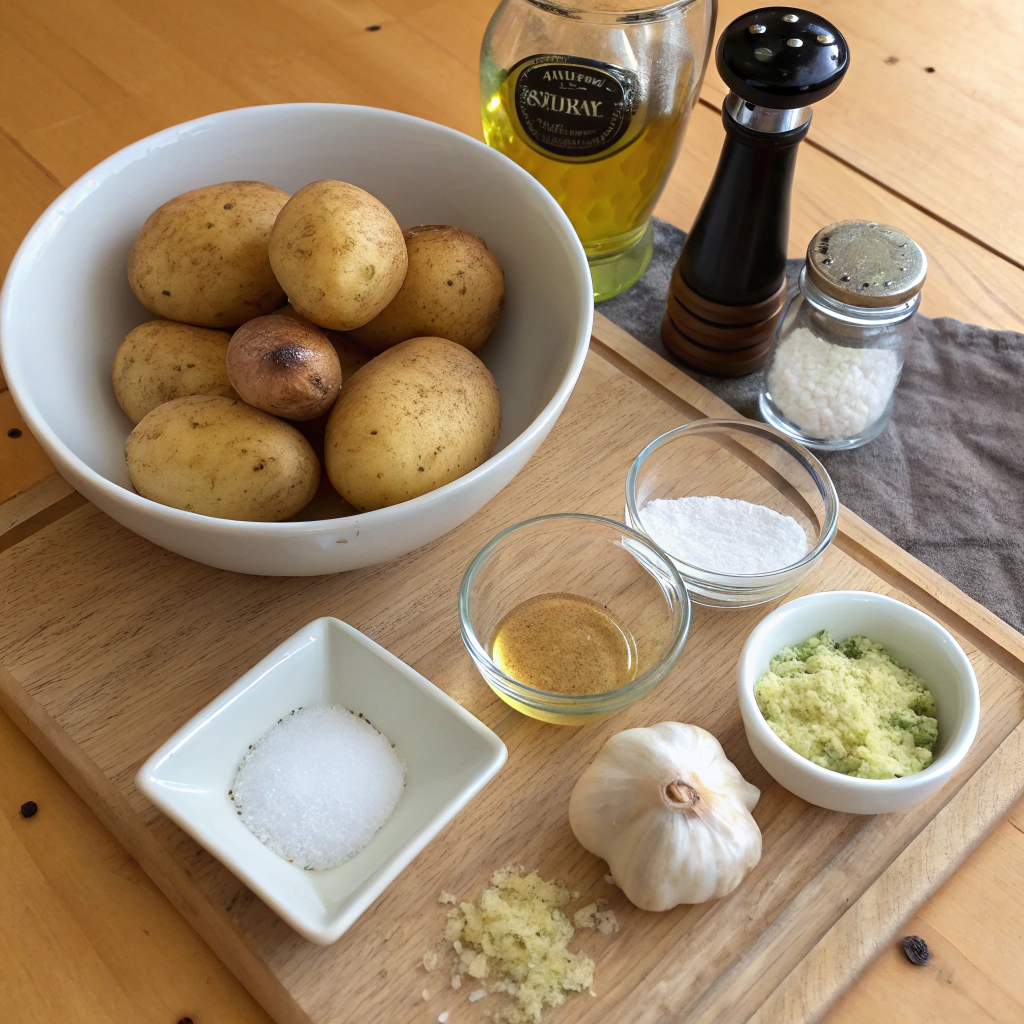
When making griddle hashbrowns, choosing the right potato variety makes all the difference. Russet potatoes are my go-to choice because their high starch content helps create that perfectly crispy exterior we all love. I learned this the hard way after trying waxy potatoes once - they just turned mushy! Idaho potatoes also work wonderfully, as they maintain their structure while developing those coveted crispy edges. Keep in mind that older potatoes tend to work better than new ones since they have less moisture. For perfect results, learning how to store potatoes properly is essential - it affects their starch content and final texture. I always look for firm, unblemished spuds without any green spots or sprouts. During peak potato season in fall, I stock up on Russets specifically for weekend griddle hashbrowns.
Let's talk about making griddle hashbrowns from fresh versus frozen potatoes. While frozen shredded potatoes are convenient, I've found that fresh-grated potatoes deliver superior texture and flavor. When using frozen potatoes for griddle hashbrowns, let them thaw completely and pat them dry before cooking. This extra step prevents that dreaded soggy middle. Fresh potatoes give you more control over the final texture, though they require more prep work. I keep both options in my kitchen - frozen for busy mornings, but fresh potatoes when I want that restaurant-quality crispiness. The key is knowing how to work with each type properly.
The secret to amazing griddle hashbrowns starts with proper potato prep. Begin by peeling your potatoes (though I sometimes leave thin-skinned varieties unpeeled for extra texture). Rinse them well to remove surface starch, which can make your hashbrowns gummy. After grating, soak the shredded potatoes in cold water for 10-15 minutes to remove excess starch. This step is crucial for achieving that golden-brown crust on your griddle hashbrowns. Drain thoroughly and pat completely dry with clean kitchen towels or paper towels. I often prep extra potatoes and store them in cold water overnight, changing the water once to prevent discoloration.
Creating perfect griddle hashbrowns starts with properly shredded potatoes. I've found that using the large holes of a box grater gives the ideal thickness for crispy results. When shredding potatoes for griddle hashbrowns, work quickly to prevent oxidation - those brown spots nobody wants! A food processor with a shredding disk is my time-saving hack for bigger batches. Keep your potato shreds uniform in size; this ensures even cooking and that satisfying crunch. Watch your fingers near the end of each potato, and consider using a cut-resistant glove. The direction you shred matters too - I go lengthwise for longer strands that create a better network of crispy potato goodness.
The key to perfectly crispy griddle hashbrowns lies in removing as much moisture as possible. After rinsing your shredded potatoes, squeeze them vigorously in a clean kitchen towel. I actually use two towels - the first to remove the initial moisture, then a second for a final squeeze. This extra step makes a huge difference in achieving that coveted crunch on your griddle hashbrowns. Some cooks swear by using a potato ricer for maximum moisture removal. I've found that letting the shreds sit in a colander for 5 minutes before squeezing helps release even more water. Remember, drier potatoes mean crispier results!
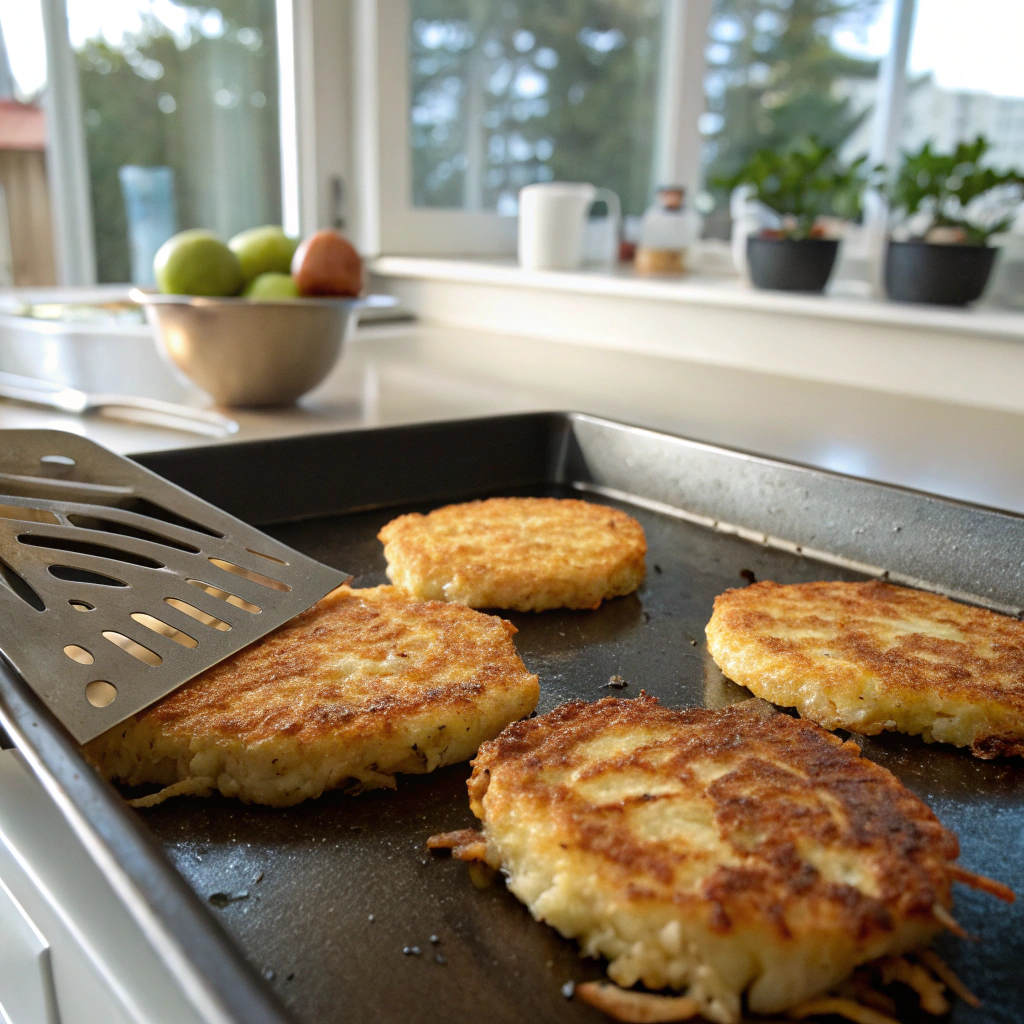
Mastering the art of spreading and flipping griddle hashbrowns takes practice, but I've got some foolproof tips. Start with a well-heated surface - I test it by sprinkling a few drops of water; they should dance and sizzle. Spread your potato shreds thinly and evenly, creating a layer about ¼-inch thick. Don't be tempted to pile them higher! Press down gently with a spatula to ensure good contact with the griddle. When making griddle hashbrowns, patience is crucial - wait until you see golden brown edges before attempting to flip. Use a wide spatula and flip confidently in one smooth motion.
The key to perfect griddle hashbrowns starts with proper seasoning. I always add salt right after spreading the potatoes on the hot surface - this helps draw out extra moisture while they cook. A generous sprinkle of fresh ground black pepper adds that classic diner taste we all love. When making hashbrowns on the griddle, I've learned timing is everything with seasonings.
Add salt too late, and you'll end up with bland spots. I like to season in layers, adding a bit more salt and pepper halfway through cooking when I flip them. This creates that perfectly seasoned potato crust that makes griddle hashbrowns so irresistible. Remember to taste test - you can always add more seasoning, but you can't take it away!
Every region puts its own spin on griddle hashbrowns, and I love trying different combinations! Down South, they often add paprika and a dash of cayenne for kick. When I'm making Southwest-style hashbrowns on the griddle, I mix in chili powder and cumin. The spices toast right on the cooking surface, creating amazing aromas. In the Midwest, where I learned to cook, we keep it simple with garlic powder and onion salt. Some folks in New England add Old Bay seasoning for a unique twist. Whatever spice blend you choose, sprinkle it evenly across your hashbrowns while they're cooking. This ensures every bite has that perfect flavor balance.
Fresh herbs and onions can transform basic griddle hashbrowns into something special. I love mixing in finely diced onions before spreading the potatoes on the cooking surface. They caramelize beautifully while your hashbrowns crisp up. Fresh chives are my go-to herb - they add a subtle oniony flavor that doesn't overpower. When making breakfast for company, I'll sometimes add fresh rosemary or thyme to my griddle hashbrowns for an elegant touch. Just remember to chop herbs finely so they distribute evenly. Dried herbs work too, but use them sparingly since their flavors are more concentrated. Always add delicate fresh herbs near the end of cooking to preserve their flavor.
Nobody likes soggy griddle hashbrowns, but it's a common problem with an easy fix. The secret is removing excess moisture before cooking. I always wrap my shredded potatoes in a clean kitchen towel and squeeze out every drop I can. When cooking hashbrowns on the griddle, spread them thin - thick piles steam instead of crisp. Keep your cooking surface hot enough (around 350°F) to create that golden crust. Another trick I've learned is letting the shredded potatoes rest in a colander for 10 minutes before cooking. This extra step helps your griddle hashbrowns achieve that perfect crispy texture throughout.
Getting evenly cooked griddle hashbrowns takes practice and patience. I've found that maintaining consistent heat is crucial - too hot, and you'll get burnt edges before the center cooks. When making hashbrowns on my griddle, I keep the temperature at medium-high and resist the urge to crank up the heat. Watch for the edges turning golden brown - that's your signal to adjust the temperature if needed. Creating an even layer helps prevent hot spots that can cause burning. Don't forget to rotate your spatula's position when flipping to ensure all edges get equal time on the cooking surface.
The secret to non-stick griddle hashbrowns starts with proper surface preparation. Always preheat your cooking surface thoroughly before adding potatoes. I learned the hard way that a cold griddle guarantees sticking! When making crispy hashbrowns, I add a thin layer of oil or butter and let it heat until it shimmers. Don't move the potatoes too soon - they'll release naturally when a proper crust forms. If you're having sticking issues with your griddle hashbrowns, try using a metal spatula with a thin edge. It slides under the potatoes more easily than plastic ones. Regular griddle seasoning maintenance also helps prevent sticking problems.
Ready to master your own crispy griddle hashbrowns? Start with fresh potatoes and remember the tips we've shared. I'd love to see your creations and hear about your cooking adventures! Drop a comment below with your favorite toppings or share how you've adapted these techniques. Join our growing community of home cooks mastering the art of griddle cooking.
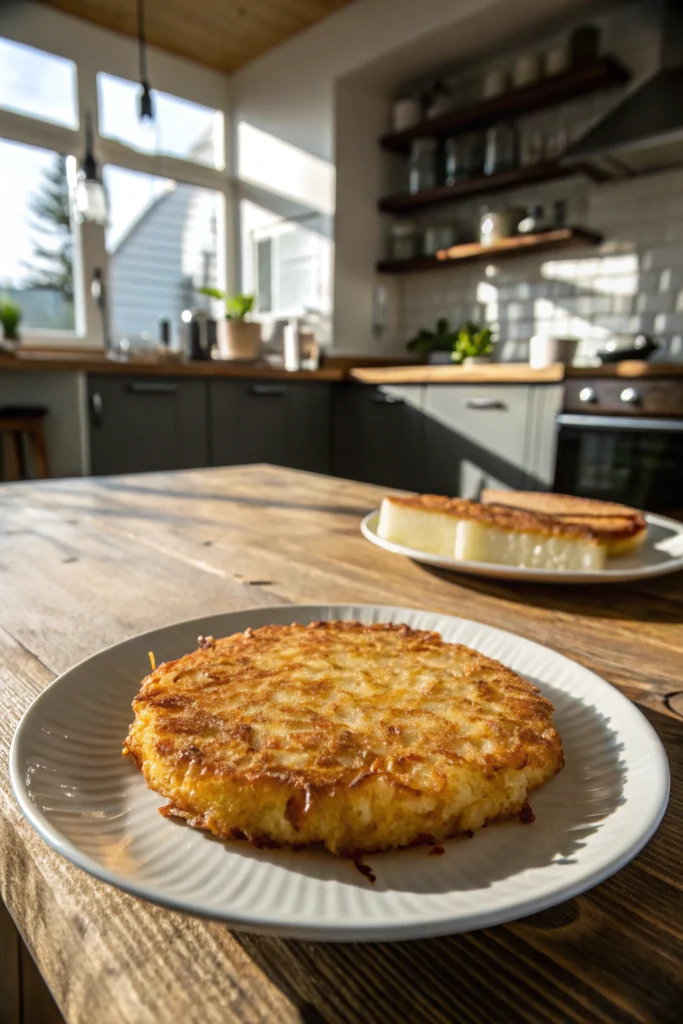
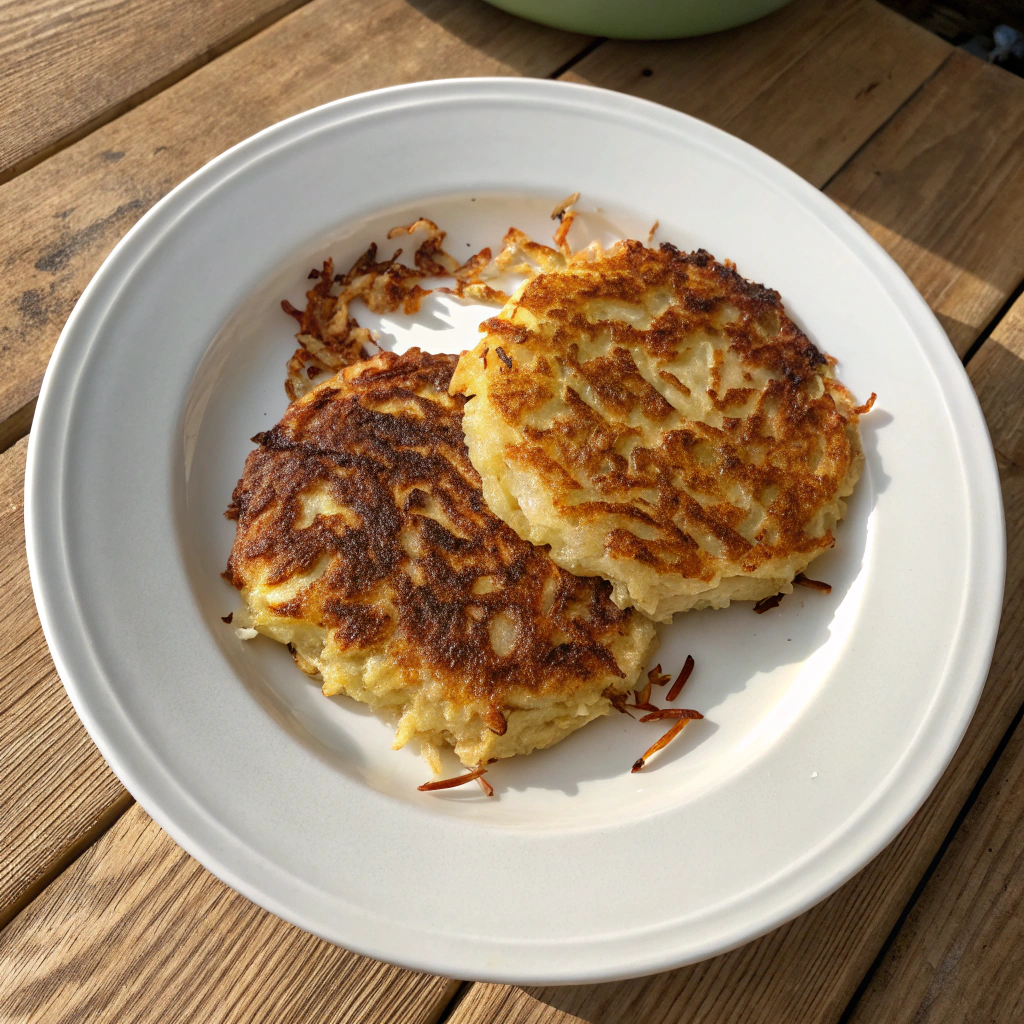
These restaurant-style griddle hashbrowns are crispy on the outside and tender inside, with perfectly golden edges that'll make your breakfast dreams come true. Made with fresh Russet potatoes and simple seasonings, this recipe delivers that classic diner taste right from your own kitchen.
Place dried potato shreds in a large bowl
Servings: 4 ServingCalories:220kcalTotal Fat:8gSodium:590mgTotal Carbohydrate:35gDietary Fiber: 3gSugars: 1gProtein:4g
Storage:
Keep leftovers in an airtight container for up to 3 days. Reheat on griddle for 2-3 minutes per side.
Substitutions:
Use frozen hash browns (thawed and dried well)
Sweet potatoes can replace Russets
Coconut oil or ghee instead of vegetable oil
Serving Suggestions:
Serve hot with eggs, bacon, or breakfast sausage.
Top with sour cream, chives, or your favorite hot sauce.