Nutritional values
Servings: 8 ServingCalories:385kcalTotal Fat:28gSodium:180mgTotal Carbohydrate:42gDietary Fiber: 3gSugars: 32gProtein:5g

You know those desserts that just transport you to a happy place? That's exactly what this coconut cream pie does for me! I first tasted an amazing version at my grandma's house in Florida, and I've spent years tweaking my recipe to match that perfect slice of heaven. Making a great coconut cream pie isn't rocket science, but there are some tricks I've learned along the way. After countless attempts (and yes, some total flops!), I've finally nailed down a foolproof method that'll give you the creamiest, most flavorful pie imaginable. Whether you're a coconut fanatic or just looking for something special to bring to your next potluck, this recipe is a total game-changer.
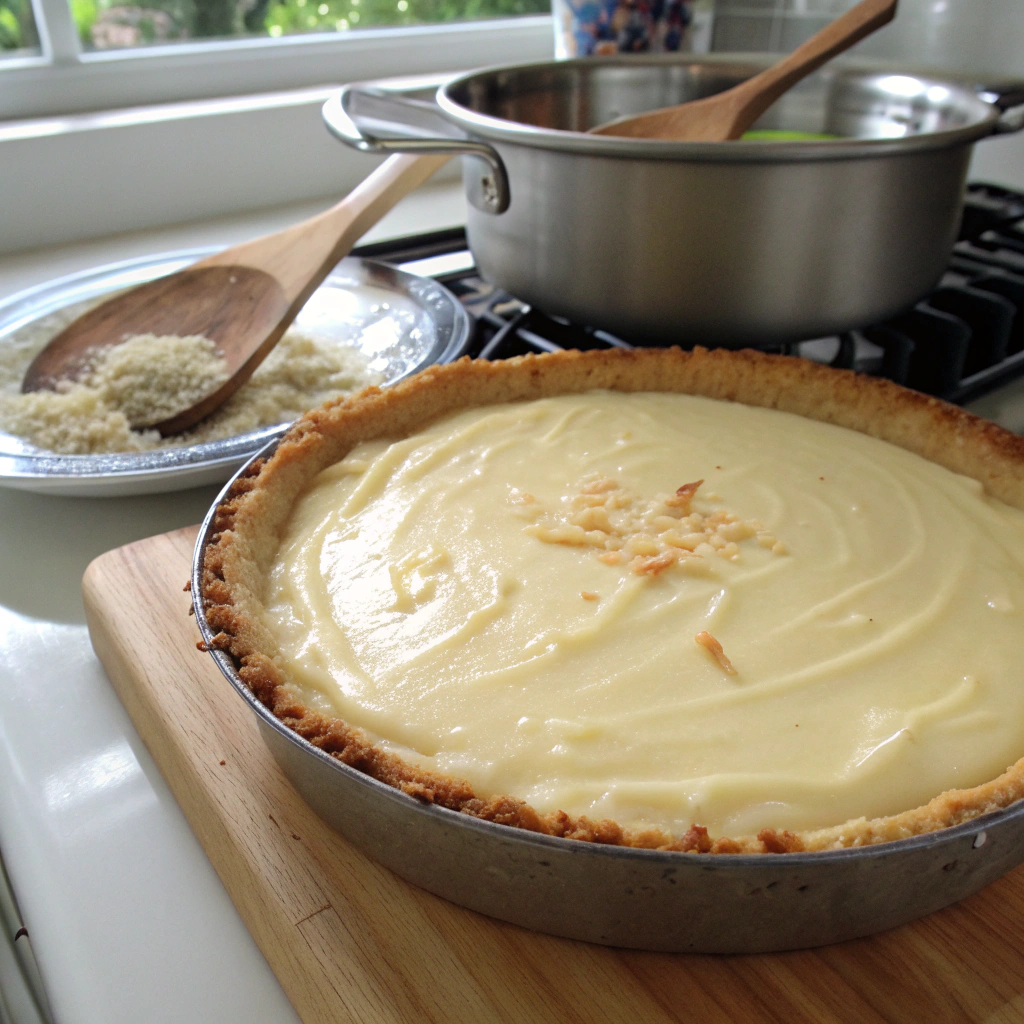
Let's talk about the foundation of any great coconut cream pie - the crust! After years of baking (and trust me, some serious crust fails), I've found that both traditional flaky pie crust and graham cracker bases have their merits. My family actually got into a heated debate about this at last year's Thanksgiving! A buttery, flaky crust gives that classic pie feel, while a graham cracker base adds this amazing honey-sweet note that just works magic with coconut. If you're new to pie-making, I'd suggest starting with the graham cracker version - it's basically foolproof and takes half the time. Plus, you can make it ahead and store it in the fridge for up to three days.
Here's the thing about coconut cream pie - nobody wants a soggy bottom! I learned this the hard way when I brought my first attempt to a church potluck (talk about embarrassing!). The secret to avoiding the dreaded soggy crust is all in the pre-baking process. For a traditional pie crust, you'll want to blind bake it with pie weights - I actually use dried beans because they're cheaper and work just as well. Keep your oven at 375°F, and don't rush it! For a delightful summer dessert alternative, try making a lemon meringue pie with its bright, citrusy flavors. A perfectly pre-baked crust for your coconut cream pie should be golden brown and smell absolutely amazing. I usually give it about 20 minutes with weights, then another 5-7 minutes without.
Want to take your coconut cream pie to the next level? Try adding toasted coconut right into your crust mixture! This little trick came to me during a late-night baking session when I was feeling experimental. For graham cracker crusts, simply replace 1/4 cup of the crumbs with finely ground toasted coconut. If you're going the traditional pastry route, you can work 2-3 tablespoons of finely shredded, toasted coconut right into your flour mixture. Just make sure you're using unsweetened coconut - the sweetened stuff can make your crust brown too quickly. This extra step adds such amazing depth to the whole pie experience.
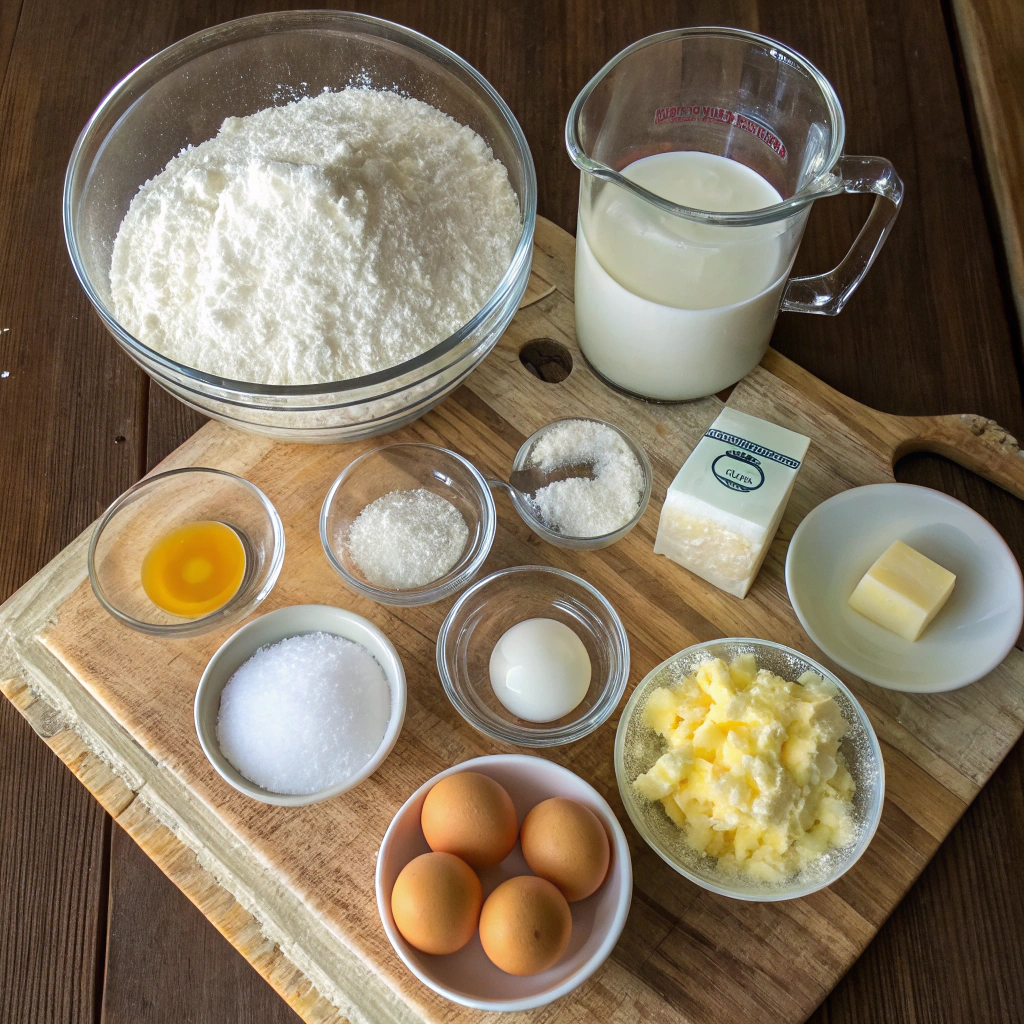
When making a coconut cream pie that'll wow your guests, choosing the right coconut milk makes all the difference. I've found that while canned coconut milk works perfectly fine, fresh coconut milk adds an amazing depth of flavor. For the richest coconut cream pie filling, look for cans marked "full-fat" - the light versions just won't give you that luxurious texture we're after. If you're feeling ambitious, try making fresh coconut milk by blending shredded coconut with hot water and straining it through cheesecloth. The result is a bright, clean taste that really shines through in the finished pie. Just remember to shake those cans well before opening, as the cream tends to separate from the liquid.
Creating the perfect coconut cream pie starts with understanding temperature control. Always begin by tempering your egg yolks - nobody wants scrambled eggs in their pie! I learned this the hard way when I first started baking. Gradually whisk hot milk into the egg mixture, then return everything to the pan. Keep the heat medium-low and stir constantly until your filling thickens. This patience is key for that dreamy, silky texture that makes a great coconut cream pie stand out. The filling should coat the back of a spoon and hold a clean line when you run your finger through it. If you're looking for more dessert options, our german chocolate cake recipe offers another delicious coconut-based treat.
The secret to a perfectly sliceable coconut cream pie lies in proper thickening techniques. While cornstarch is traditional, I've found that combining it with egg yolks creates the ideal texture. Start by mixing your cornstarch with cold coconut milk to prevent lumps - this is crucial for smooth results. Some bakers swear by adding a touch of flour alongside the cornstarch for extra stability. Always cook your filling until it bubbles gently for at least two minutes to activate the thickeners fully. This ensures your coconut cream pie will hold its shape beautifully when sliced.
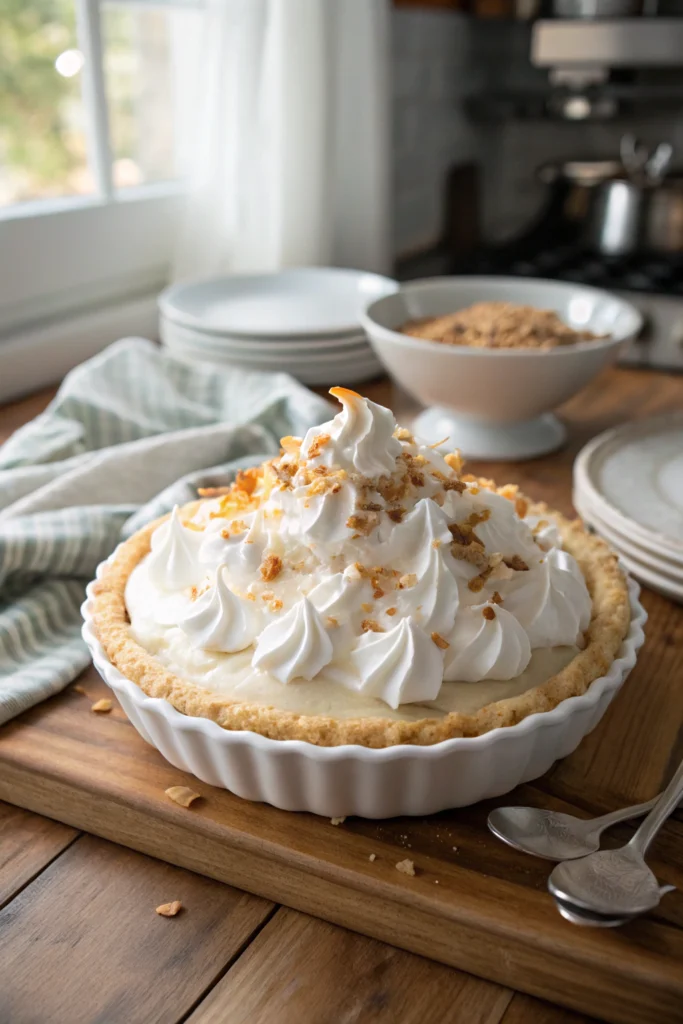
A traditional coconut cream pie deserves a cloud-like meringue topping that's both sturdy and silky. Start with room temperature egg whites - they'll whip up better and create more volume. Add cream of tartar to stabilize your meringue, then gradually beat in sugar until stiff, glossy peaks form. When spreading over your coconut cream pie, make sure to seal the edges completely to prevent weeping. I love creating dramatic swirls and peaks before toasting the meringue to a golden brown. This classic finish makes your pie look like it came straight from a high-end bakery.
For a coconut cream pie that holds up beautifully for hours, stabilized whipped cream is your best friend. I've tried various methods, but unflavored gelatin dissolved in cold water works like magic. Whip your cream until soft peaks form, then slowly drizzle in the melted gelatin mixture. This simple trick prevents your topping from deflating or weeping. The result is a picture-perfect coconut cream pie that stays fresh-looking even after sitting out during dessert. Just remember to chill your bowl and beaters beforehand for the best volume.
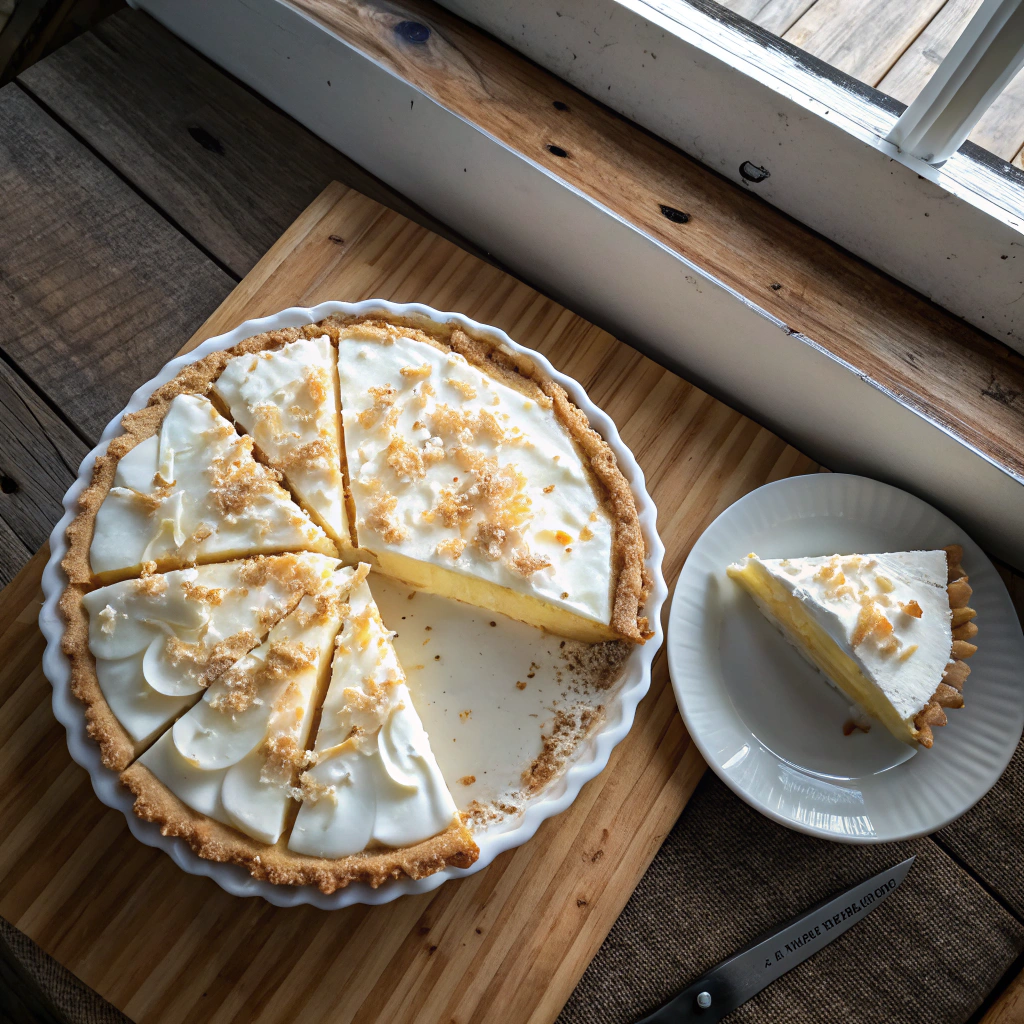
Taking your coconut cream pie from homey to showstopping is all about the finishing touches. Start with well-chilled stabilized whipped cream and a large piping bag fitted with your favorite tip. I like creating a border of rosettes around the edge of my coconut cream pie, then filling the center with delicate stars. Toast some coconut flakes until golden and sprinkle them between your piped designs. This adds both visual interest and a wonderful crunch. Remember to pipe your decorations just before serving for the freshest presentation.
Making your coconut cream pie ahead of time can be a real lifesaver during busy weeks. The key to storing this creamy dessert is proper temperature control and coverage. I've found that the best way to keep your coconut cream pie fresh is to wrap it carefully with plastic wrap, making sure it touches the filling's surface to prevent a skin from forming. The pie will stay delicious in the fridge for up to 4 days, though the crust might soften slightly over time. I always recommend adding the whipped topping just before serving to maintain that picture-perfect presentation. For best results, keep your pie in the coldest part of your fridge, usually toward the back, and away from strong-smelling foods.
While many folks don't realize it, coconut cream pie freezes surprisingly well if you follow a few simple steps. Before freezing your coconut cream pie, let it cool completely in the refrigerator. Once chilled, wrap the pie tightly in a double layer of plastic wrap, followed by a layer of aluminum foil. This triple-wrap method prevents freezer burn and keeps your pie tasting fresh. The pie can be frozen for up to 2 months, but I find it's best within the first month. When you're ready to enjoy, thaw your pie overnight in the refrigerator. Remember to add fresh whipped cream and toasted coconut just before serving.
Making the perfect coconut cream pie starts with understanding how to avoid common pitfalls. The filling should be cooked until it's thick and bubbling - this usually takes about 5 minutes of constant stirring. If your pie turns out runny, it's likely because the custard wasn't cooked long enough to activate the cornstarch properly. Another tip I've learned is to temper your eggs slowly to prevent curdling. When cooling your pie, resist the urge to rush the process. A properly set coconut cream pie needs at least 4 hours in the refrigerator. This patience pays off with clean, beautiful slices that hold their shape.
Transform your classic coconut cream pie into a tropical paradise by adding some island-inspired twists. I love incorporating a splash of dark rum into the custard filling - it adds warmth and complexity without overpowering the coconut flavor. For an extra tropical punch, try folding in some well-drained crushed pineapple to your coconut cream pie filling. The key is to cook the pineapple briefly with the custard to remove excess moisture. You can also brush the crust with a rum glaze before adding the filling, which adds another layer of flavor and helps prevent sogginess. These additions make the pie perfect for summer gatherings.
Sometimes it's too hot to turn on the oven, which is when this no-bake version of coconut cream pie becomes a lifesaver. Start with a graham cracker crust that's simply pressed into the pan - no baking required. The filling uses instant pudding mix combined with cream cheese for stability, and plenty of coconut for that authentic flavor. I've found that chilling the bowl and beaters helps the filling set up perfectly. This version comes together in about 15 minutes, though you'll still need to let it chill thoroughly. It's become my go-to summer dessert recipe.
The finishing touch on any coconut cream pie is perfectly toasted coconut. Spread sweetened coconut flakes on a baking sheet in a thin, even layer for the best results. Watch it carefully - coconut can go from golden to burnt in seconds! I like to toast extra and store it in an airtight container for quick garnishing. For a dramatic presentation, try creating a coconut cream pie with varying shades of toasted coconut, from light golden to deep amber. Sprinkle the toasted coconut just before serving to maintain its delightful crunch. You can also mix some into the whipped cream topping for extra texture.
Ready to create your own perfect coconut cream pie? Start with room temperature ingredients and take your time with the custard – it's worth the extra attention. Remember to chill thoroughly before slicing, and don't forget to toast some coconut for that picture-perfect garnish. Share your creation with friends and family, and don't hesitate to ask questions in the comments below!
This rich, creamy coconut pie features a buttery crust, velvety custard filling, and cloud-like whipped topping. Made with both coconut milk and shredded coconut, each bite delivers authentic tropical flavor that'll transport you to paradise.
Cool completely
Cook until thick and bubbling
Cover surface with plastic wrap and refrigerate
Servings: 8 ServingCalories:385kcalTotal Fat:28gSodium:180mgTotal Carbohydrate:42gDietary Fiber: 3gSugars: 32gProtein:5g
Storage Tips:
Keep refrigerated for up to 4 days
Add whipped topping just before serving
Can be frozen without topping for up to 2 months
Substitutions:
Use traditional pie crust instead of graham cracker
Replace whole milk with half-and-half for richer texture
Use unsweetened coconut for less sugar content
Serving Suggestions:
Serve chilled with fresh berries
Drizzle with caramel sauce
Pair with coffee or tropical iced tea