
Oh my goodness, you guys – I can’t believe it took me this long to share my classic tiramisu recipe with you! After countless attempts (and some hilarious coffee-soaked disasters), I’ve finally nailed down the perfect version. You know how some desserts just transport you? This one takes me right back to my first trip to Rome, where I fell in love with authentic Italian tiramisu at a tiny cafe near the Pantheon. Making this classic tiramisu recipe at home might seem daunting, but I promise it’s totally doable. Trust me – if I can master it while juggling two kids and a puppy who loves stealing ladyfingers, you’ve got this! Let’s dive into this coffee-scented slice of heaven together.
Essential Ingredients for Authentic Tiramisu
Choosing the Right Mascarpone Cheese
Let’s talk cheese, friends! Last week, I learned the hard way that not all mascarpone is created equal – my classic tiramisu recipe totally flopped when I tried using that bargain brand from the corner store. For the best results, look for Italian-made mascarpone that’s super creamy and pure white (not yellowish). I swear by the Galbani or BelGioioso brands, which you can find at most grocery stores. The texture should be silky smooth, never grainy. And here’s a pro tip from my Italian neighbor Rosa: always bring your mascarpone to room temperature before making tiramisu. It’ll blend like a dream and give you that perfectly smooth filling we’re all after.
Best Coffee Types for Classic Tiramisu
Y’all won’t believe what happened when I used instant coffee in my classic tiramisu recipe last Christmas – my coffee-snob brother nearly disowned me! For that authentic Italian flavor, you’ll want to use freshly brewed espresso, cooled to room temperature. Don’t have an espresso machine? No worries! I use my trusty Moka pot or a strong brew from my French press. The key is getting that deep, rich coffee flavor without making it bitter. Stay away from flavored coffees (sorry, hazelnut lovers!) and stick to medium-dark roasts. My go-to is Lavazza Qualità Rossa, but any good Italian roast will do. Just remember – the coffee needs to pack a punch!
Quality Ladyfingers: What to Look For
Can we talk about my great ladyfinger hunt of 2022? Finding the right ones for my classic tiramisu recipe became like a treasure hunt through every Italian market in town! Here’s what I’ve learned: you want Savoiardi-style ladyfingers, which are crisp and light – not the soft ones from the bakery section. Look for Italian brands like Vicenzi or Bonomi (game-changers, seriously!). They should be dry and slightly golden, with a sugary coating that helps them hold up when dipped in coffee. And here’s a secret: if you can’t find them locally, check Amazon or your nearest Italian specialty store. Just don’t substitute with pound cake – trust me on this one!
Making the Perfect Classic Tiramisu Base
Coffee Soaking Technique for Traditional Tiramisu
When making a classic tiramisu recipe, the coffee dipping stage can make or break your dessert. I learned this the hard way after countless attempts in my home kitchen! Start by brewing strong espresso or very strong coffee and letting it cool completely – warm coffee will make your ladyfingers too mushy. For the perfect dip, mix your cooled coffee with a splash of marsala wine (or rum if that’s what you have).
The quick dip technique is crucial: hold each ladyfinger by the end and count “one-Mississippi” as you dip. This gives you the ideal soaking time for a traditional Italian tiramisu that’s moist but not soggy. I like setting up a little assembly line with my coffee mixture in a shallow dish and a clean plate ready for the dipped cookies.
Whipping the Perfect Mascarpone Filling

The secret to a silky classic tiramisu recipe lies in how you handle the mascarpone mixture. Start with room temperature ingredients – this is non-negotiable! I’ve found that cold mascarpone often leads to lumpy filling. First, whip your egg yolks with sugar until pale and fluffy (about 3-4 minutes). In a separate bowl, beat your mascarpone just until smooth – overbeating can make it grainy. When folding in the whipped cream, use gentle, sweeping motions to keep the air bubbles intact. This creates that cloud-like texture that makes authentic Italian tiramisu so dreamy. Remember to scrape the bottom of the bowl to ensure everything is evenly mixed.
Layering Tips for Restaurant-Style Results
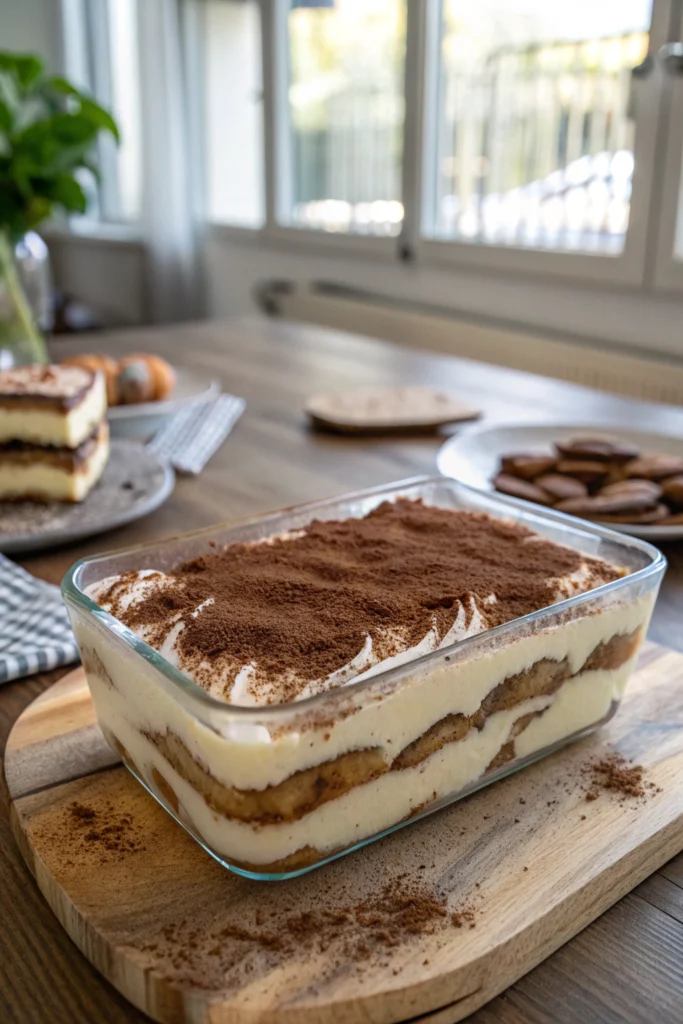
To achieve that picture-perfect classic tiramisu recipe result, layering technique is everything. Start with a thin spread of mascarpone mixture on the bottom of your dish – this prevents the first layer of ladyfingers from sliding around. Place your coffee-dipped cookies in tight rows, trimming them if needed to fit your dish perfectly. I’ve found that gently pressing down each layer helps eliminate air pockets. When adding the mascarpone mixture, use an offset spatula to spread it evenly. For the final dusting of cocoa powder, use a fine-mesh sieve and apply it right before serving. This prevents the cocoa from getting soggy and maintains that beautiful contrast in your dessert.
Common Mistakes in Traditional Tiramisu Making
Over-Soaking Your Ladyfingers
One of the biggest pitfalls when making a classic tiramisu recipe is over-soaking the ladyfingers. I’ve seen so many homemade versions turn into coffee soup because of this! The key is to keep the dip lightning-fast – literally just a second per side. Remember that ladyfingers are like tiny sponges that will continue absorbing liquid even after you’ve placed them in your dish. If you’re following a traditional Italian approach, you want them moist but still structurally sound. I always keep a few extra ladyfingers on hand, just in case some break during the dipping process. Think of them like little building blocks – they need to stay firm enough to hold up your layers.
Temperature Control for Classic Tiramisu Success
Making a classic tiramisu recipe requires careful attention to temperature at every stage. Room temperature mascarpone is essential for a smooth filling, but don’t let it sit out too long. If your kitchen is particularly warm, watch your assembly time carefully. The mascarpone mixture should be cool but workable – too warm and it’ll become loose and hard to spread. Once assembled, your tiramisu needs proper chilling time. I always give mine at least 6 hours in the fridge, though overnight is even better. This resting period lets the flavors meld and helps the dessert set properly. Keep it away from strong-smelling foods in your fridge to preserve its delicate flavor.
Fixing Runny Mascarpone Mixture
If your classic tiramisu recipe starts looking soupy, don’t panic! Several factors can cause a runny mascarpone mixture, but most are fixable. First, check if your mascarpone was too warm when mixing – this is often the culprit. To salvage a loose mixture, try folding in some extra whipped cream that’s been beaten to stiff peaks. Another trick is to pop your bowl in the refrigerator for 15-20 minutes, then gently re-whip. Just be careful not to overbeat, as this can make the mixture grainy. If all else fails, use the slightly loose mixture for your bottom layers and save the firmer portions for the top. The overnight chill will help everything set beautifully.
Storing and Serving Your Classic Tiramisu
Ideal Setting Time for Traditional Tiramisu
Making a classic tiramisu recipe requires patience, as proper setting time is crucial for the best texture and flavor melding. After assembling your tiramisu, let it chill in the refrigerator for at least 4-6 hours, though overnight resting yields the most authentic results. During this time, the coffee-soaked ladyfingers soften perfectly while the mascarpone cream firms up. I’ve learned through experience that rushing this step can result in a runny dessert. The classic tiramisu recipe really shines when all the layers have time to become one cohesive treat. Keep the dish covered with plastic wrap while it sets to prevent any refrigerator odors from affecting the delicate flavors.
Storage Tips to Maintain Freshness
Your classic tiramisu recipe will stay fresh in the refrigerator for up to 4 days when stored properly. Always keep it in an airtight container to prevent it from absorbing other food aromas. I recommend placing a piece of plastic wrap directly on the surface of the tiramisu to prevent a skin from forming on the mascarpone cream. The coffee-soaked ladyfingers will continue to soften slightly over time, making the texture even more luscious. When working with this classic tiramisu recipe, avoid freezing it, as the mascarpone can become grainy upon thawing. If you need to make it ahead, it’s best to prepare it no more than two days before serving.
Perfect Plating Techniques
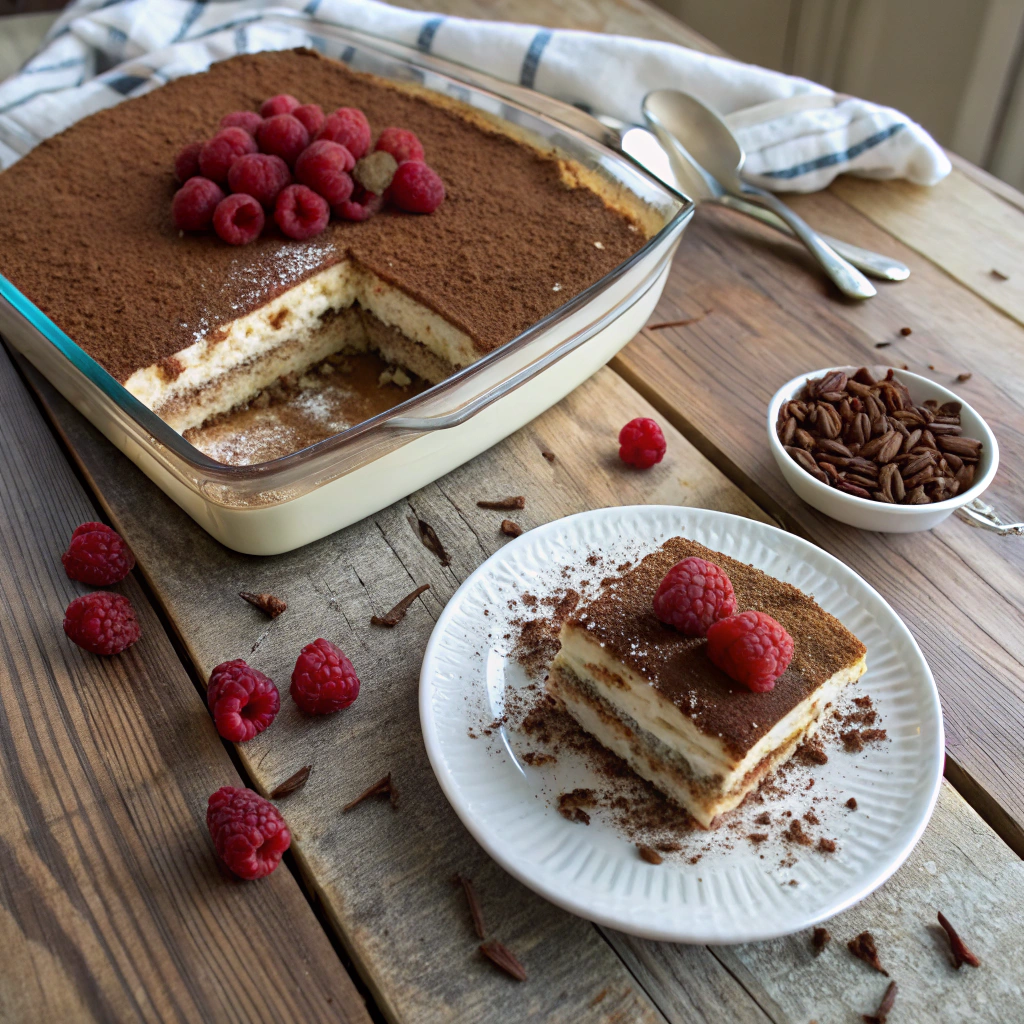
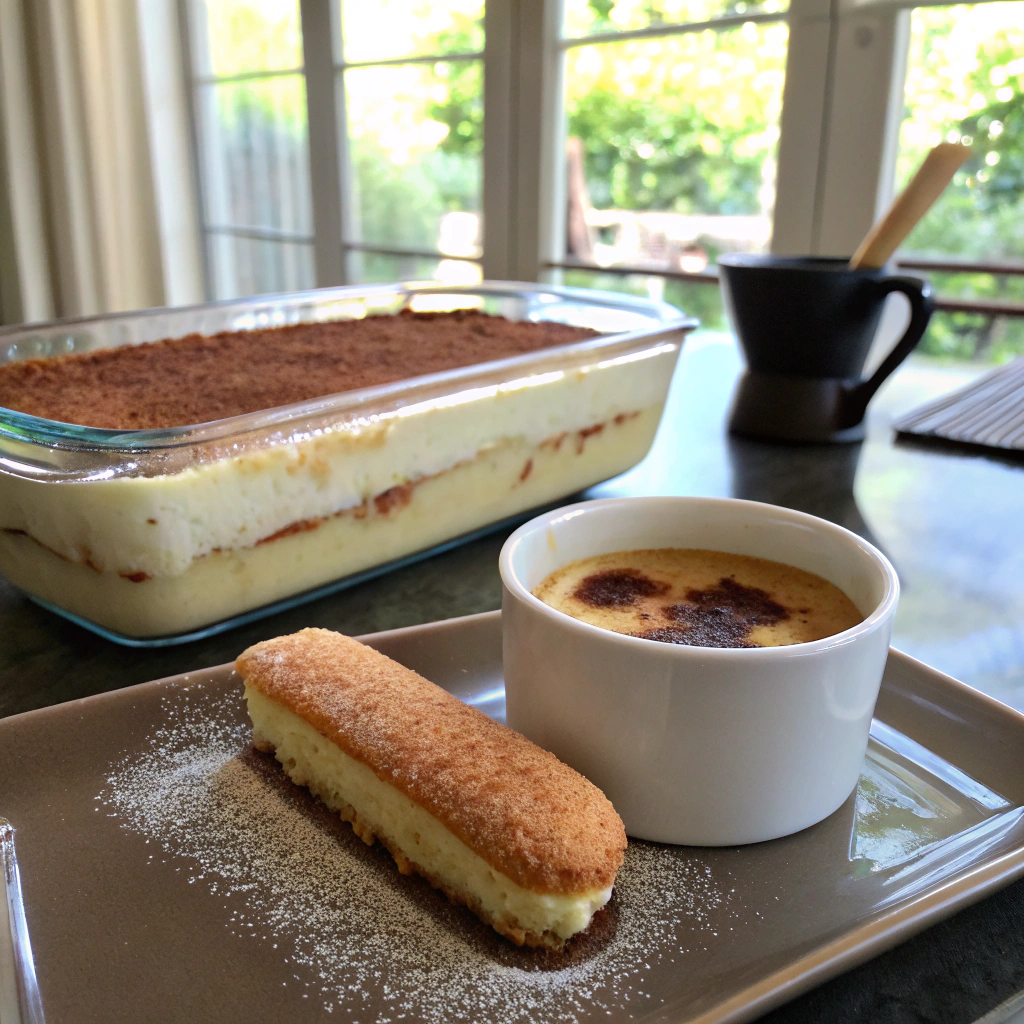
Presenting your classic tiramisu recipe with style makes it even more special. Start by chilling your serving plates in the refrigerator for about 15 minutes – this helps keep the dessert at the perfect temperature while eating. Use a sharp knife dipped in hot water between cuts to achieve clean, precise portions. When working with chocolate garnishes, knowing how to properly melt chocolate will ensure perfect decorative touches for your tiramisu.
For an authentic Italian touch, dust each serving with a fresh coating of cocoa powder just before bringing it to the table. The classic tiramisu recipe deserves elegant presentation, so consider using clear glass dishes to showcase the beautiful layers. A few fresh berries or a mint leaf can add a lovely pop of color without overshadowing the traditional look.
Variations on Classic Tiramisu Recipe
Non-Alcoholic Traditional Tiramisu Options
Creating a non-alcoholic version of the classic tiramisu recipe doesn’t mean sacrificing flavor. Instead of marsala wine or rum, try using extra strong coffee mixed with a splash of coffee extract for depth. You can also experiment with different coffee varieties – a medium roast creates a milder flavor, while dark roast provides robust intensity. When making this alcohol-free classic tiramisu recipe, consider adding a teaspoon of vanilla extract to the mascarpone mixture for extra warmth. I’ve found that using decaf coffee works just as well, making this dessert perfect for everyone to enjoy. Remember to adjust the liquid ratio slightly when omitting alcohol to maintain the right texture.
Seasonal Classic Tiramisu Adaptations
Adapting your classic tiramisu recipe to reflect the seasons brings exciting new flavors to this beloved dessert. In summer, try folding fresh berry puree into the mascarpone cream or adding lemon zest for brightness. Fall calls for warming spices like cinnamon and nutmeg in your classic tiramisu recipe, while winter versions might include a hint of peppermint or orange essence. Spring variations could feature delicate floral notes like lavender or rose water. I love incorporating seasonal fruits between layers – strawberries in summer, poached pears in fall. Just remember to keep additions minimal to maintain the authentic character of the dessert.
Single-Serving Tiramisu Portions
Transforming a classic tiramisu recipe into individual portions makes serving easier and creates an elegant presentation. Use small glass jars or dessert cups to layer the components, maintaining the same ratios as the full-sized version. When making these mini versions of the classic tiramisu recipe, I find it helpful to use a piping bag for neat mascarpone cream layers. The coffee-dipped ladyfingers can be cut to fit your serving vessels perfectly. These individual portions set faster than a large tiramisu, usually requiring only 2-3 hours in the refrigerator. Plus, they’re perfect for portion control and make delightful gifts for dinner parties.
Start Creating Your Perfect Tiramisu
Equipment Checklist
- 9×13 inch baking dish
- Electric mixer
- Mixing bowls
- Shallow dish for dipping
- Measuring cups and spoons
- Spatula
- Sifter for cocoa
Time-Saving Prep Tips
- Brew coffee ahead and chill
- Bring mascarpone to room temp
- Separate eggs while cold
- Set up dipping station assembly line
- Measure ingredients before starting
Serving Suggestions
Ready to make your own classic tiramisu? Start by gathering fresh ingredients – quality matters here! Remember to give it at least 6 hours in the fridge before serving. I love dusting each portion with extra cocoa right before eating. Share your creation with friends and family, and don’t forget to snap a photo before that first heavenly bite! For a delightful dessert pairing, try serving your tiramisu with easy chocolate mousse for an elegant dessert spread.
Classic Tiramisu Recipe
A traditional Italian dessert featuring layers of coffee-dipped ladyfingers and creamy mascarpone filling. This classic tiramisu balances rich espresso flavors with light, airy cream for the perfect after-dinner treat.
Ingredients
Instructions
Prepare Coffee Mixture
- Combine cooled espresso and marsala wine in a shallow dish
- Set aside at room temperatureCan substitute coffee liqueur for marsala wine
Make Mascarpone Filling
- Beat egg yolks and sugar until pale yellowabout 3-4 minutes
- Add mascarpone and vanilla, beat until smooth
- In separate bowl, whip heavy cream until stiff peaks form
- Gently fold whipped cream into mascarpone mixtureMixture should be smooth and light
Assemble Tiramisu
- Quick-dip each ladyfinger in coffee mixture1 second per side
- Layer dipped ladyfingers in 9x13 inch dish
- Spread half the mascarpone mixture evenly
- Repeat layers with remaining ingredients
- Dust top with cocoa powderKeep layers even for best presentation
Chill and Serve
- Cover with plastic wrap
- Refrigerate for minimum 6 hoursovernight preferred
- Dust with fresh cocoa powder before servingDessert should be firmly set
Nutritional values
Servings: 12 ServingCalories:385kcalTotal Fat:25gSodium:95mgTotal Carbohydrate:32gDietary Fiber: 1gSugars: 24gProtein:7g
Note
Storage:
Keep refrigerated up to 4 days. Do not freeze.
Substitutions:
For non-alcoholic version, replace wine with extra coffee.
Serving suggestion:
Serve chilled with fresh berries and mint leaves.