
Y’all, let me tell you about my love affair with breakfast strata! Last Christmas morning, when my kids were bouncing off the walls at 6 AM, I was actually calm and collected because I’d prepped this amazing breakfast strata the night before. It’s basically a savory bread pudding that does all the heavy lifting while you sleep.
The best part? While other parents were frantically flipping pancakes, I just popped my strata in the oven and sipped my coffee. I’ve tested dozens of breakfast strata recipes over the years, and let me tell you – this version is foolproof. Whether you’re hosting brunch or just want to treat your family to something special, this make-ahead wonder will become your new best friend.
Breakfast Strata Basics: What Makes It Special
The Layered Magic Behind a Perfect Strata
Think of a breakfast strata like building the world’s coziest sandwich – but way better! You start with day-old bread (trust me, fresh bread turns mushy), then layer it with your favorite breakfast goodies. I learned the hard way that random layering just doesn’t cut it. The key to a perfect breakfast strata is strategic placement – picture it like playing Tetris with your ingredients. Start with a bread foundation, add your protein layer (hello, crispy bacon!), then cheese, veggies, and repeat. Each layer should be evenly distributed so every bite has that perfect mix of flavors. My mother-in-law taught me to press down gently on each layer – it helps the custard mixture seep into all the nooks and crannies.
Essential Ingredients for Success
Let’s talk about what makes a breakfast strata truly sing. First up, the bread – I usually grab a loaf of sourdough or French bread and let it sit out overnight. Fresh eggs are non-negotiable – they’re the backbone of your custard mixture. For cheese, you’ll want something that melts like a dream (I’m looking at you, Gruyere!). The milk-to-egg ratio is crucial for that perfect custardy texture. After making probably a hundred breakfast stratas, I’ve found that whole milk works best – low-fat just doesn’t give you that rich, silky result. And don’t forget seasonings! A pinch of nutmeg might sound weird, but it’s my secret weapon for that “what makes this so good?” factor.
Why Overnight Stratas Win Breakfast
Here’s why breakfast strata has become my go-to for busy mornings – it’s all about that overnight magic! When you let your strata hang out in the fridge overnight, something amazing happens. The bread soaks up all that eggy goodness, and the flavors get super friendly with each other. I discovered this time-saving trick when I was planning my sister’s baby shower. Making a breakfast strata the night before saved my sanity! Plus, the texture is just better – trust me, I’ve tried the quick version, and it’s just not the same. The overnight rest gives you that perfect custard-like center while keeping the top deliciously crispy.
Creating Your Perfect Breakfast Strata Base
Choosing the Right Bread Foundation
The foundation of any breakfast strata starts with good bread. Day-old bread works best since it soaks up the egg mixture without getting mushy. I learned this the hard way after making a breakfast strata with fresh bread that turned into a soggy mess! Crusty French bread, sourdough, or even leftover bagels make excellent choices. Cut your bread into 1-inch cubes and let them dry out on the counter for a few hours if you’re using fresh bread. For a richer breakfast strata, try brioche or challah – these egg-based breads add an extra layer of decadence. Just remember that softer breads need less soaking time than heartier varieties.
Best Cheese Combinations for Stratas
Creating the perfect breakfast strata is all about layering flavors, and cheese plays a starring role. Sharp cheddar pairs beautifully with ham and provides that classic breakfast casserole taste we all love. Gruyere adds a nutty sophistication that works wonderfully in a breakfast strata with mushrooms and herbs. For a Mediterranean twist, try a combination of mozzarella and fontina. I always recommend grating your own cheese rather than using pre-shredded – it melts more smoothly and gives your breakfast strata that perfect stretchy texture. Don’t be afraid to mix different cheeses for more complex flavors.
Liquid-to-Bread Ratio Secrets
The key to a perfectly textured breakfast strata lies in getting the right liquid-to-bread ratio. For every 6 cups of bread cubes, you’ll want about 2½ cups of liquid (eggs and milk combined). I usually use 6-8 large eggs mixed with whole milk or half-and-half for richness. Let your breakfast strata rest in the fridge for at least 4 hours, though overnight is even better. This resting time allows the bread to soak up the custard evenly. If your mixture looks too dry after resting, add a splash more milk. The bread should be moist but not swimming in liquid.
Mix-and-Match Strata Filling Ideas
Classic Breakfast Meat Options
When it comes to breakfast strata fillings, traditional breakfast meats add both flavor and protein. Crispy bacon, crumbled sausage, or diced ham are fantastic additions that make your breakfast strata more filling and satisfying. I love making a breakfast strata with maple-glazed bacon – the sweet and salty combination is unbeatable. Remember to cook and drain your meats well before adding them to prevent excess grease. Canadian bacon offers a leaner option that still packs plenty of flavor. For a special occasion breakfast strata, try adding some crumbled prosciutto or pancetta.
Veggie Combinations That Work
A well-crafted breakfast strata can showcase seasonal vegetables beautifully. Sautéed mushrooms, spinach, and caramelized onions create a rich, earthy flavor profile. When making a vegetable-heavy breakfast strata, be sure to cook out excess moisture from your veggies first. Bell peppers and asparagus add wonderful color and crunch to spring versions. For a heartier take, roasted butternut squash and kale work beautifully in fall breakfast strata recipes. I always season my vegetables well and let them cool before layering them into the dish.
Herb and Seasoning Pairings
The right herbs and seasonings can transform a basic breakfast strata into something extraordinary. Fresh thyme and rosemary complement mushroom and sausage versions beautifully, while chives and dill work perfectly in a smoked salmon breakfast strata. Don’t forget basics like salt, pepper, and a pinch of nutmeg in the egg mixture. I love adding fresh basil to Italian-inspired versions with tomatoes and mozzarella. When using dried herbs, remember they’re more potent than fresh – use about one-third the amount. Garlic powder and onion powder can add depth without overwhelming other flavors.
Time-Saving Breakfast Strata Tips
Prep-Ahead Strategies
Making a breakfast strata doesn’t have to be a morning hassle! I love assembling my breakfast strata the night before – it’s a game-changer for busy mornings. Start by cutting your bread into cubes and letting them dry out for an hour. This helps the bread soak up all that delicious egg mixture without getting mushy. While the bread’s drying, brown your sausage and chop your veggies. Layer everything in your baking dish, pour over the egg mixture, and pop it in the fridge. Your morning breakfast strata will be ready to bake when you wake up! Pro tip: Keep ingredients like shredded cheese and chopped herbs in separate containers if you’re prepping more than a day ahead.
Storage and Freezing Guidelines
Your breakfast strata can be a meal-prep superstar! Once baked and cooled, portion your breakfast strata into airtight containers – they’ll keep in the fridge for up to 3 days. For longer storage, wrap individual portions tightly in plastic wrap, then foil. The savory egg casserole freezes beautifully for up to 2 months. Just remember to label each package with the date and contents. When freezing an unbaked strata, add an extra 1/4 cup of milk to the egg mixture since some liquid will evaporate during the freezing process. This keeps your breakfast casserole moist and flavorful.
Reheating Your Morning Strata
Getting your breakfast strata perfectly reheated is crucial for maintaining its texture. For refrigerated portions, microwave individual servings for 1-2 minutes, covered with a damp paper towel. The moisture helps prevent the egg mixture from drying out. When reheating a larger breakfast strata portion, cover with foil and warm in a 325°F oven for 15-20 minutes. For frozen pieces, thaw overnight in the fridge before reheating. I like to sprinkle a little fresh cheese on top during the last few minutes of reheating – it adds a nice touch to your morning casserole.
Troubleshooting Common Strata Challenges
Fixing a Soggy Breakfast Strata

Nobody wants a soggy breakfast strata! For a delicious morning alternative, try making scrambled eggs with cheese – they’re quick and equally satisfying. The key to avoiding this common issue lies in the bread-to-liquid ratio. Use day-old bread that’s slightly dried out – fresh bread holds too much moisture. When preparing your breakfast strata, make sure your bread cubes are evenly sized for consistent soaking. If you notice excess liquid pooling at the bottom while assembling, add a handful more bread cubes. Another trick is to toast your bread cubes in the oven for 10 minutes before layering. This creates a sturdier base that can handle the egg mixture without turning mushy.
Preventing Dry or Overcooked Results
Achieving the perfect breakfast strata texture means finding that sweet spot between dry and soggy. Start checking your breakfast strata about 10 minutes before the recipe’s suggested baking time. The center should be set but still have a slight jiggle. Using a glass baking dish helps you monitor the bottom and sides for even browning. Cover your casserole with foil if the top is browning too quickly. Remember that your strata will continue cooking slightly after you remove it from the oven. Let it rest for 5-10 minutes before serving.
Perfect Texture Solutions
Creating the ideal breakfast strata texture starts with quality ingredients. Choose hearty bread that can stand up to the egg mixture – sourdough and French bread are my favorites. When layering your breakfast strata, alternate between wet and dry ingredients. This helps distribute moisture evenly throughout the dish. Don’t press down too firmly on the layers – you want some air pockets for a lighter, fluffier result. If your previous attempts have been too dense, try whisking the eggs until they’re extra frothy before combining with the milk. This adds air and creates a lighter texture.
Start Your Strata Journey Today
Get ready to make the best breakfast strata with this simple plan! Start by grabbing eggs, bread, milk, cheese, and your favorite mix-ins from the store. Prep everything Saturday night for a stress-free Sunday brunch. Try topping your strata with fresh herbs, diced tomatoes, or a dollop of sour cream. For special occasions, consider serving your strata alongside brioche french toast for an impressive breakfast spread. Remember to share your creations with us – we love seeing your kitchen successes!
Breakfast Strata
A savory bread pudding loaded with eggs, cheese, and your choice of breakfast meats and vegetables. Prep it the night before for an effortless morning meal that feeds a crowd.
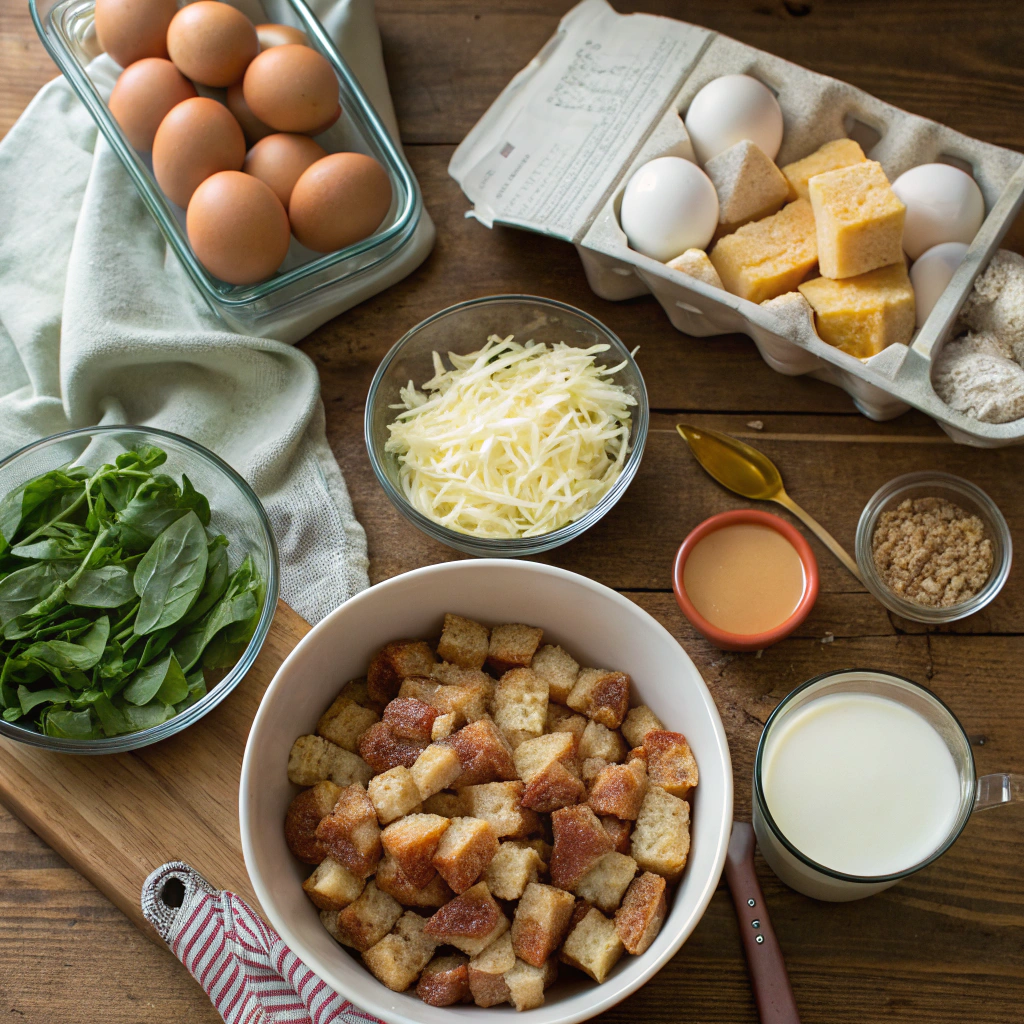
Ingredients
For the Base:
For the Filling:
Instructions
Prepare the Baking Dish
- Grease a 9x13-inch baking dish with butter
- Layer half the bread cubes in the bottomMake sure bread is slightly dried out for best results
Create the Egg Mixture
- Whisk eggs, milk, salt, pepper, and nutmeg in a large bowl until well combined
- Beat mixture until slightly frothyThis creates a lighter texture in the final dish
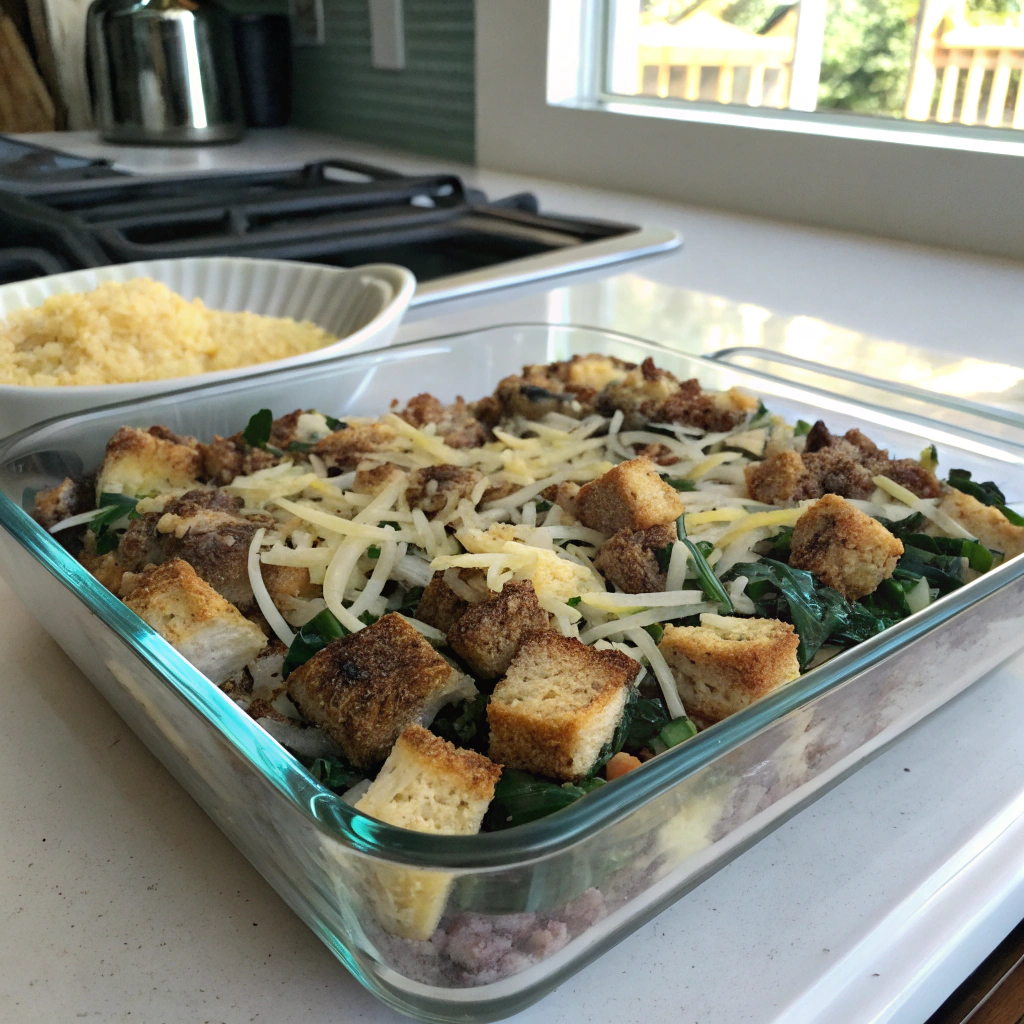
Layer the Ingredients
- Top first bread layer with half the sausage, vegetables, and cheese
- Add remaining bread cubes
- Layer remaining sausage, vegetables, and cheesePress down gently between layers
Add Egg Mixture
- Pour egg mixture evenly over layers
- Press down gently to help bread absorb liquidAll bread should be moistened
Rest and Bake
- Cover with plastic wrap
- Refrigerate 8 hours or overnight
- Remove from fridge 30 minutes before baking
- Bake at 350°F for 45-50 minutes until golden brownCenter should reach 165°F
Nutritional values
Servings: 8 ServingCalories:385kcalTotal Fat:22gSodium:780mgTotal Carbohydrate:28gDietary Fiber: 2gSugars: 4gProtein:24g
Note
Storage:
Keep leftovers covered in refrigerator for up to 3 days.
Reheat individual portions in microwave for 1-2 minutes.
Substitutions:
Use dairy-free milk and cheese for lactose-free version.
Swap sausage for ham or bacon.
For vegetarian option, double the vegetables and add mushrooms.
Serving Suggestion:
Garnish with fresh herbs and serve with fresh fruit salad.