Oh my goodness, can we talk about messy stovetops for a minute? After 15 years of cooking (and cleaning up after my sauce-splashing husband), I’ve finally mastered keeping a clean stove without losing my mind. Last week, while making my famous spaghetti sauce, I watched a splash of tomato sauce land perfectly on my freshly cleaned cooktop. Instead of panicking, I knew exactly what to do! Whether you’re dealing with burnt-on pasta water or greasy spatters, I’m here to share my tried-and-true methods for maintaining a clean stove. Trust me, these tips will save you hours of scrubbing and prevent those dreaded crusty buildups that seem impossible to remove.
Daily Stove Cleaning Essentials
Quick-Clean Methods After Each Meal
Y’all, the secret to a clean stove is tackling messes while they’re fresh! I learned this the hard way after letting marinara sauce sit overnight (big mistake!). Now, I keep a spray bottle of vinegar-water solution and microfiber cloth right by my cooking area. As soon as dinner’s done and the stove has cooled, I give it a quick wipe-down. For those stubborn spots, I sprinkle some baking soda, let it sit for five minutes, then wipe with a damp cloth. My mother-in-law taught me to keep a designated “stove cloth” hanging on my oven handle – it’s seriously been a game-changer! Just remember to wait until the burners are completely cool before cleaning.
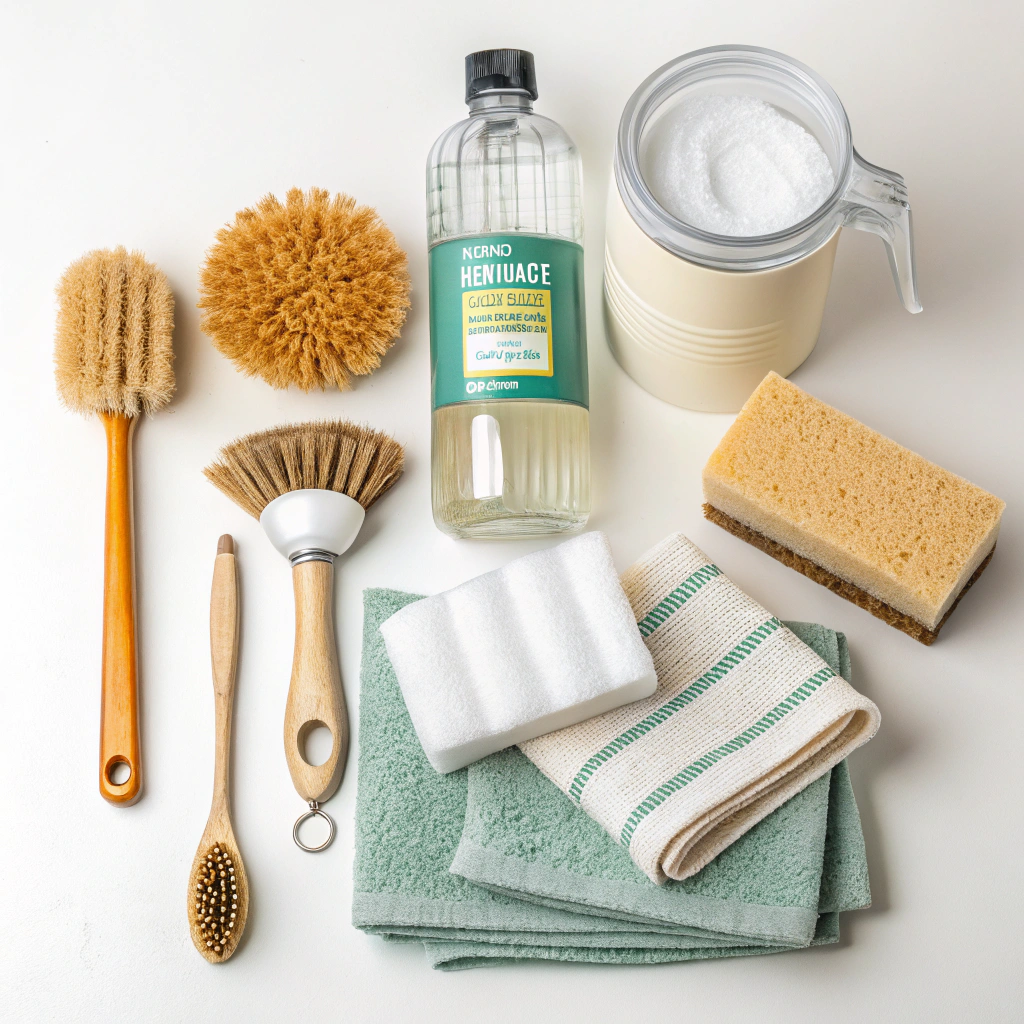
Must-Have Tools for Stove Maintenance
Let me share what’s in my “stove cleaning arsenal” – and trust me, I’ve tried everything under the sun! First up is my favorite microfiber cloth set (scored on sale at Target last month). You’ll also need a good degreasing spray, but don’t waste money on fancy cleaners. I keep my clean stove looking fresh with simple dish soap and white vinegar. The real MVP is my silicone scraper – it’s gentle enough not to scratch but tough on dried-on messes. Don’t forget old toothbrushes for those tricky spots around burners! And here’s a pro tip: keep paper towels handy for quick grease clean-ups while cooking.
Preventing Stubborn Stains While Cooking
Listen up, because this changed my whole cooking game! To maintain a clean stove while you’re actually using it, grab some aluminum foil sheets. I line the areas around my burners when I’m cooking anything that might splatter. My sister laughed when she saw this trick, but now she’s totally hooked! Another game-changer is using splatter screens – especially when frying bacon (learned that one the messy way). Keep a damp cloth nearby to wipe spills immediately, and always use the right-sized pots and pans. The key is catching those messes before they have a chance to bake on and become tomorrow’s scrubbing nightmare.
Deep Clean Your Stove Like a Pro
Natural Cleaning Solutions That Actually Work
Want to clean your stove without harsh chemicals? Your pantry probably has everything you need! Mix baking soda with just enough water to form a paste – this is my go-to for tackling tough stains. I love using white vinegar to cut through grease; just spray it on and let it sit for 10 minutes. The fizzing reaction when you combine these two is so satisfying and really gets the job done.
For daily upkeep, keep a spray bottle of diluted dish soap nearby. A quick wipe after cooking prevents buildup and makes deep cleaning so much easier. My grandmother taught me to add a few drops of lemon essential oil to the mix – it fights grease and leaves the kitchen smelling amazing.
Tackling Burnt-on Food and Grease
Nothing’s worse than discovering burnt food stuck to your clean stove surface. For these stubborn spots, I’ve found that patience is key. Start by sprinkling baking soda directly on the spot, then spritz with water until it forms a paste. Let it sit for at least 20 minutes – I usually do this while preparing dinner.
For really tough spots, cover the area with a damp cloth soaked in hot water. The steam helps loosen the grime, making it easier to wipe away. Remember to use a non-abrasive scrubber to protect your stovetop’s finish. I learned this the hard way after scratching my first apartment’s stove!
Restoring Stove Grates to Their Former Glory
Cast iron grates looking dull? Here’s my foolproof method to get them gleaming again. First, soak them in hot, soapy water for 30 minutes – this loosens up most of the grime. For extra greasy grates, add a cup of white vinegar to your soaking solution. It’s amazing how much easier cleaning becomes after this step.
After soaking, use a stiff brush to scrub away any remaining residue. I keep an old toothbrush handy for those hard-to-reach corners. Once clean, dry the grates thoroughly and apply a light coat of cooking oil to prevent rust. This extra step has kept my grates looking great for years.
Smart Solutions for Different Stove Types
Gas Stove Cleaning Techniques
To clean your stove properly, always start by removing the grates and burner caps. I’ve found that soaking these parts makes the whole process much easier. Use a soft cloth to wipe down the stovetop surface, paying special attention to the areas around the burners where food often falls.
For those pesky burner ports, grab a toothpick or safety pin to clear any clogs. A clean stove doesn’t just look better – it cooks better too! Make sure to check the ignition points regularly; a quick cleaning with rubbing alcohol on a cotton swab keeps them sparking efficiently.
Electric Stovetop Care Guide

Taking care of an electric stove requires a gentle touch. Start by letting the coils cool completely before you clean your stove surface. Never submerge the heating elements in water – instead, wipe them down with a damp cloth. For stubborn spots, use a non-abrasive cleaner specifically designed for electric stovetops.
The drip pans beneath the coils need regular attention too. Remove them carefully and soak in warm, soapy water. While they’re soaking, tackle the main stovetop surface with a degreasing solution. A clean stove makes cooking so much more enjoyable!
Glass Cooktop Maintenance Tips
Glass cooktops need special care to maintain their sleek appearance. After each use, wait for the surface to cool before you clean your stove. Use a specialized glass cooktop cleaner for best results – I learned this after trying generic cleaners that left streaks everywhere.
For dried-on spills, use a razor scraper held at a 45-degree angle. Be gentle to avoid scratching! Once the debris is gone, buff the surface with a microfiber cloth. A clean stove is especially important with glass cooktops since every little smudge shows. I always keep cleaning supplies nearby for quick touch-ups after cooking.
Tough Stains and Problem Areas
Removing Baked-on Grease Naturally
Let’s tackle those stubborn stovetop messes without harsh chemicals! For best results, use a clean microwave method first to remove any airborne grease that may have settled on your stovetop. To clean stove surfaces naturally, start with a paste made from baking soda and water. This gentle but effective mixture works wonders on burnt-on food and grease. Spread it over tough spots and let it sit for 15 minutes while you enjoy your morning coffee.
For really stubborn spots on your cooktop, spritz some white vinegar over the baking soda paste. The fizzing action helps lift away grime, making it easier to clean stove surfaces thoroughly. I learned this trick from my grandmother, and it’s never failed me! Just wipe everything down with a damp microfiber cloth, and you’ll be amazed at how the grease melts away.
Dealing with Rust and Discoloration
Keeping your clean stove looking its best means dealing with those pesky rust spots and discoloration that pop up over time. For light rust stains, a simple lemon juice and salt paste works beautifully. Apply it directly to the affected area and let it sit for about 10 minutes before scrubbing gently with a non-abrasive pad.
When tackling discolored areas on your stovetop, try mixing cream of tartar with water to form a paste. This natural whitening agent helps restore your clean stove’s original shine without scratching the surface. I discovered this method after ruining an expensive cleaner, and it works even better! Remember to always test any new cleaning solution in a small, hidden area first.
Cleaning Hard-to-Reach Stove Parts
Getting a truly clean stove means reaching those tricky spots where crumbs and grease love to hide. Use an old toothbrush wrapped with a thin microfiber cloth to get into tight corners and around burner elements. This technique helps you maintain a spotless cooking surface without damaging delicate parts.
For those awkward spaces between the stovetop and counter, try wrapping a butter knife with a cleaning cloth secured by a rubber band. This DIY tool helps you clean stove crevices effectively without scratching surfaces. I came up with this solution after dropping countless cleaning tools down the gap! Don’t forget to pull out removable parts and soak them in warm, soapy water for thorough cleaning.
Maintaining Your Clean Stove
Weekly Cleaning Schedule That Works

Keeping your clean stove sparkling doesn’t have to be a huge chore with the right routine. I’ve found that spending just 10 minutes each evening wiping down the cooktop prevents major buildup. After dinner, while surfaces are still slightly warm, use a damp cloth to quickly clean stove spills and splatters.
Make Sunday your quick maintenance day for a deeper clean. Remove burner grates and wipe underneath, tackle any sticky spots with your favorite cleaner, and buff dry with a microfiber cloth. This simple weekly routine has saved me hours of scrubbing and keeps my stovetop looking fresh. Plus, it makes cooking so much more enjoyable when you start with a clean surface!
Best Products for Stove Protection
Investing in the right products helps maintain a clean stove longer between deep cleanings. I swear by silicone burner covers that catch spills before they burn on. These affordable protectors have saved me countless hours of scrubbing and make daily stovetop maintenance so much easier.
A good-quality glass cooktop cleaner is essential for keeping your clean stove looking its best. Look for non-abrasive formulas that won’t scratch surfaces. I also recommend keeping a spray bottle of diluted white vinegar nearby for quick cleanups. Pro tip: place drip pans under burners to catch spills and make cleanup a breeze!
Seasonal Deep-Clean Checklist
Every three months, give your clean stove some extra TLC with a thorough deep cleaning. While you’re at it, make sure to clean fridge surfaces nearby to prevent grease from settling there too. Start by removing all removable parts and soaking them in hot, soapy water. While those soak, tackle the stovetop with your preferred cleaner, working in small sections to ensure nothing gets missed.
Don’t forget to pull the stove out (if possible) and clean stove sides and the floor underneath. This prevents grease buildup and keeps pests away. Check burner holes for clogs, and use a pin to clear any blockages carefully. I usually do this seasonal cleaning when I switch out my kitchen’s seasonal decor – it helps me remember and makes it feel less like a chore!
Keep Your Stove Spotless Starting Today
Quick-Start Cleaning Guide
Ready to tackle that clean stove project? Start with our simple daily routine! Grab your supplies and let’s get your cooking space sparkling. Remember, consistency beats perfection – even five minutes of daily maintenance makes a huge difference. Join thousands of home cooks who’ve transformed their kitchens using these methods. Drop a comment below with your favorite cleaning tips!